- Welcome
- Features
- Use Case
- Introduction
- Working with CCR
- Basic navigation and usage tips
-
Working with patients
- Working with patients
- Searching for a patient
- Looking up a patient with an MRN
- Using the Quick Search Utility to search for a patient
- Performing an advanced search
- Performing a search with criteria based on study or cancer group specific attributes
- Restrictions on searches
- Adding a patient
- Adding a patient who has never been a UUHSC patient
- Removing a patient record from a cancer group database
- Viewing/editing a patient record
- Marking a patient record ready for review
- Viewing/editing the demographic information of a patient who has never been a UUHSC patient
- Viewing a patient's clinic visit patient review page
- Providers
- Treatment protocols
- Diagnoses and staging
- Tumors
- Race
- Patient classifications
- Aliases
- Cancer group studies administration
- Patient contacts
-
Studies and study enrollment
- Studies
- Viewing/editing study-specific data for a patient
- Viewing/editing a patient's enrollment in a study
- Study enrollment
- Enrolling a patient in a study
- Removing a patient from a study
- Viewing/editing a patient's enrollment in a study from the patient detail window
- Patient consents
- Patient consents (study enrollment window)
- Recording a patient consents
- Recording a patient consents (study enrollment window)
- Deleting a patient consent record
- Deleting a patient consent record (study enrollment window)
- Editing a patient consent record
- Editing a patient consent record (study enrollment window)
- Scanned consent forms
- Scanned consent forms (study enrollment window)
- Uploading a scanned consent form
- Uploading a scanned consent form (study enrollment window)
- Removing a scanned consent form
- Removing a scanned consent form (study enrollment window)
- Viewing a previously uploaded consent form
- Viewing a previously uploaded consent form (study enrollment window)
-
Specimens
- Specimens
- Adding a specimen to a patient record
- Linking a specimen from itBioPath to a patient record
- Removing a specimen from a patient record
- Viewing/editing a specimen in a patient record
- Accessing a specimen's itBioPath record
- Recording an alias for a specimen
- Deleting a specimen alias
- Editing a specimen alias
- Linking a previously unlinked specimen to an itBioPath record
- Specimens associated with a medical event
- Linking a medical event to an existing specimen in the patient record
- Adding a specimen to a medical event
- Linking a specimen from itBioPath to a medical event
- Removing a specimen from a medical event
- Viewing/editing a specimen that is associated with a medical event
-
Lab tests
- Lab tests
- Setting up a lab test type to be automatically imported into the patient records of a cancer group
- Adding lab rest results to a patient record
- Reviewing a patient's UUHSC lab test records for importing into CCR
- Deleting a lab test result from a patient record
- Viewing/editing a lab test result
- Lab tests associated with a medical event
- Adding lab test results to a medical event
- Linking a medical event to a previously entered lab test result record
- Adding a lab test result to a medical event and a patient record at the same time
- Removing a lab test result from a medical event
- Viewing/editing a lab test result that is associated with a medical event
-
Medical events
- Medical events
- Adding a medical event to a patient record
- Removing a medical event to a patient record
- Viewing/editing a medical event
- Tools to facilitate medical event data entry
- Associated medical events
- Associating a medical event with other medical events
- Removing a medical event's association with another medical event
- CPT codes
- Adding a CPT code to a medical event
- Removing a CPT code to a medical event
- Medical event classification
- Assigning a classification to a medical event
- Removing a classification from a medical event
-
Chemo and systemic therapy events
- Chemo and systemic therapy events
- Therapy agents
- Entering the default agents for a specific therapy regimen
- Adding a therapy agent to a chemotherapy medical event record
- Removing a therapy agent from a chemotherapy medical event record
- Resetting therapy agents and dosages to match the default values for a selected regimen
- Editing a therapy agent record in a chemotherapy medical event
- Chemotherapy adverse events
- Adding an adverse event record to a chemotherapy medical event
- Removing an adverse event record to a chemotherapy medical event
- Editing an adverse event in a chemotherapy medical event
-
Radiation therapy events
- Radiation therapy events
- Treatment summaries
- Adding a radiation therapy sequence to a radiation therapy medical event
- Deleting a radiation therapy sequence to a radiation therapy medical event
- Editing a radiation therapy sequence in a radiation therapy medical event
- Radiation therapy adverse events
- Adding an adverse event record to a radiation therapy medical event
- Deleting an adverse event record from a radiation therapy medical event
- Editing an adverse event record for a radiation therapy medical event
-
Imaging events
- Imaging events
- Images
- Adding an image to an imaging event
- Uploading an image from an imaging event
- Adding an image to an imaging event without uploading it
- Viewing an image from an imaging event
- Deleting an image from an imaging event
- Editing the description of an image
- Findings
- Adding a finding from an imaging event
- Deleting a finding from an imaging event
- Editing a finding from an imaging event
-
Enterprise data warehouse and tumor registry records
- ITS Enterprise Data Warehouse
- Linking an encounter (medical event) from the Enterprise Data Warehouse to a patient record
- Linking a previously unlinked medical event record to an EDW encounter
- Importing a lab test result from the EDW into a medical event and a patient record at the same time
- Performing a text search of EDW records using keywords associated with a medical event type
- Performing a text search of EDW records using keywords associated with pathology reports
- Performing a text search in an EDW report using a keyword that has not been automatically generated
- Refining the list of EDW reports included in a text search
- Reviewing a patient's UUHSC encounter and clinical records for medical events to add to their CCR record
- Viewing a patient's EDW records
- Viewing a patient's EDW records from within a pathology report record
- Viewing the details of a UUHSC clinical record
- Finding a UUHSC encounter for a patient in EDW
- Viewing a patient's tumor registry records
- Viewing the details of a UUHSC encounter
-
Pathology reports
- Pathology reports
- Adding a pathology report to a medical event
- Linking an existing pathology report to a medical event
- Adding a new (not previously existing) pathology report to a medical event
- Removing a pathology report from a medical event
- Viewing/editing a pathology report
- Tools to facilitate pathology report data entry
-
Using the Patient Review Summary page
- Adding a treatment protocol to a patient record from the patient review page
- Diagnoses and staging from the patient review page
- Diagnoses
- Adding a diagnosis to a patient record from the patient review page
- Deleting a diagnosis to a patient record from the patient review page
- Editing a patient's diagnosis from the patient review page
- Staging
- Adding staging information to a diagnosis
- Deleting staging information from a diagnosis
- Editing Staging Information
- Worklists
- Reports
-
Cancer group administration
- Cancer group administration
- Starting the Cancer Group Administration
- Cancer Group Medical Events Administration
- Adding a Medical Event Type to the List of Medical Event Types of Interest to a Cancer Group
- Removing a Medical Event Type from the List of Medical Event Types of Interest to a Cancer Group
- Editing a Cancer Group Medical Event Type
- Making an Event Type Inactive
- Activating an Inactive Event Type
- Associating a Medical Event Type with a Specific Study
- Removing a Medical Event Type Study Association
- Sharing a Medical Event Type with Another Cancer Group
- Ending the Sharing of a Medical Event Type with a Specific Cancer Group
- Using an Event Type Owned and Shared by Another Cancer Group
- Ceasing the Use of an Event Type Owned and Shared by Another Cancer Group
- Adding a Standard of Care Profile
- Deleting a Standard of Care Profile
- Standard of Care Profiles
- Editing a Standard of Care Profile
- Adding a Checklist Item to a Standard of Care Profile
- Patient Education Materials
- Adding a Patient Education Packet to a Standard of Care Profile
- Removing a Checklist Item from a Standard of Care Profile
- Removing a Patient Education Packet from a Standard of Care Profile
- Viewing the Contents List of a Patient Education Packet
- Auto Generated Events
- Adding an Auto Generated Event to a Standard of Care Profile
- Removing an Auto Generated Event from a Standard of Care Profile
- Editing an Auto Generated Event in a Standard of Care Profile
- The Metabuilder
- Security
- Administering cancer group users
- Administering users — study-based roles
- Dictionaries
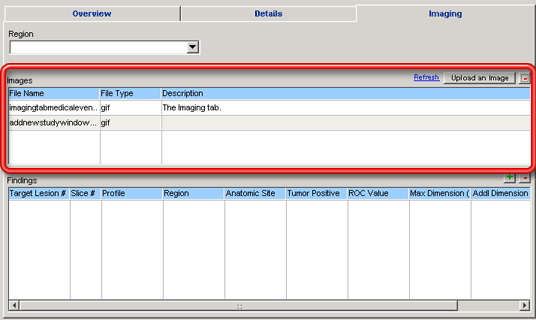
Images from imaging events can be uploaded into the CCR database, which then allows users to access that image from the medical event record. Your image file must be in JPG, GIF, AVI or PDF format. See Viewing an Image from an Imaging Event for instructions on how to view the image after it has been uploaded. For instructions on how to add an image to the imaging event without uploading it (for example, if you do not have access to the image itself) see Adding an Image to an Imaging Event Without Uploading It.
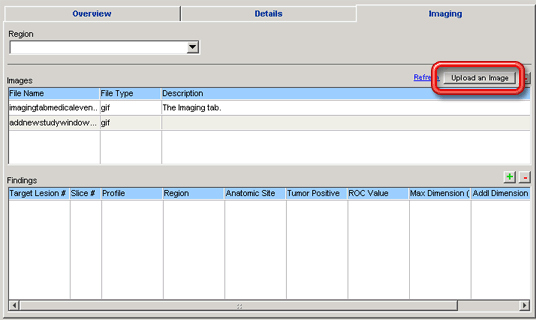
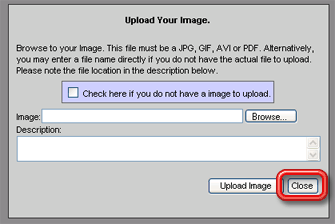
To upload an image from an imaging event into the CCR database:
1. Open the Medical Event Detail window for the imaging medical event in question. See Viewing/Editing a Medical Event for instructions on how to do this.
2. Select the Imaging tab.
3. Click on the Upload an Image button above the Images grid on that tab.
The Add Image window will open in a separate window outside of the CCR desktop environment.
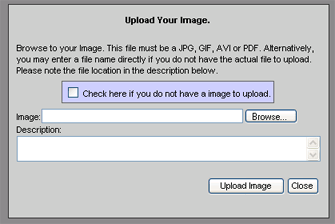
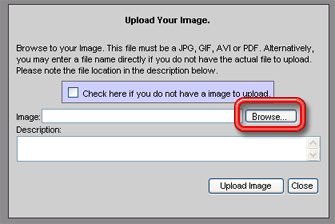
4. Click on the Browse… button to browse the network or your hard drive to locate the image file you want to upload.
The Choose File window (essentially an Open dialog window) will open.
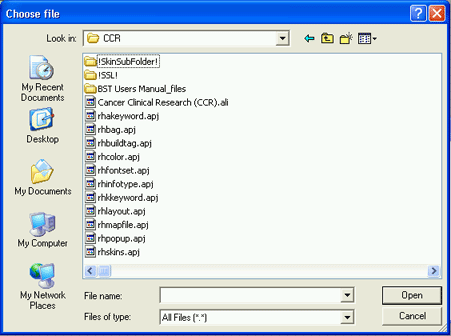
5. Select the image file from the location where you saved it and click on the Open button.
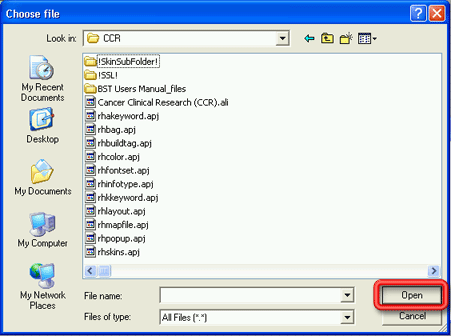
The Choose File pop-up window will close and the path and file name for the image file should now appear in the Image field on the Add Image window.
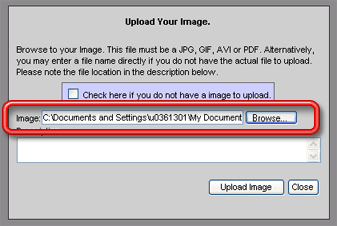
You can also simply enter the location of the image file (complete with all folders/directors and subfolders/subdirectories) into the Image field if you know it.
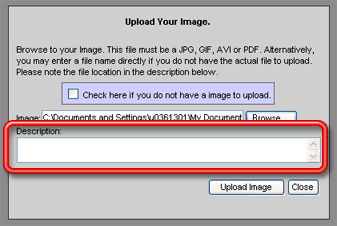
6. If appropriate, enter a description of the image in the Description field.
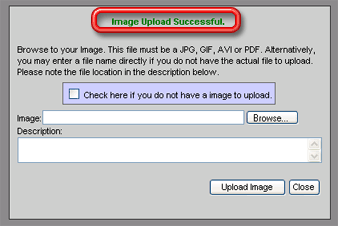
7. Click on the Upload Image button to upload the image file to the database. The words Image upload successful. will appear in green on the Add Image window. Show me what this looks like. The window will remain open to allow you to upload additional image files.
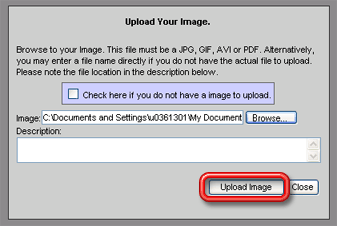
To close the window without uploading any image files to the database, click the Close button instead of the Upload Form button.
8. If you do have multiple images from the imaging event to upload at this time, repeat steps 4 through 7 until all of the forms have been uploaded.
Do not upload images from other imaging events at the same time. All of the images that are uploaded will be linked to the current medical event.
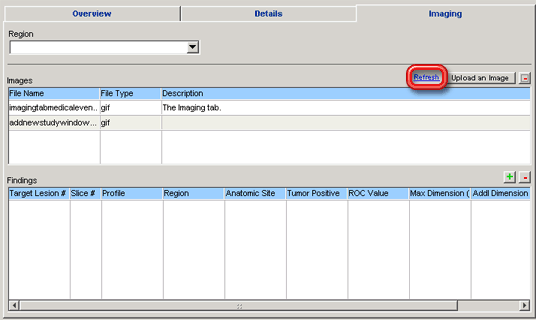
9. When you are finished uploading images, click the Close button to close the Add Image window. The Add Image window will close, but the newly uploaded images will not yet appear in the Images grid on the Imaging tab of the Medical Event Detail window.
10. Click on the Refresh hyperlink above the Images grid on the Imaging tab of the Medical Event Detail window. The Images grid will be refreshed to show all of the images that have been added to the current medical event.