- Welcome
- Use case
- Getting Started
-
Searching Records
- Performing a Basic Search
- Performing an Advanced Search
- Performing a List Search
- Performing a Keyword Search of UUMC Pathology Reports for all Patients in the Database
- Performing a Keyword Search of UUMC Pathology Reports for the Patients Associated with a Specific Set of Specimens
- Restrictions on Searches
- Reports
-
iQ Tool
- Adding Columns to a Query
- Starting the iQ Tool
- iQ Tool Window
- Current Query Data Group
- Saved Queries List
- Top Portion of the Selected
- Display or Report Columns Section
- Find/Filters Section
- Running a Preexisting Query
- Creating a Query
- Create Query Window
- Copying and Altering a Preexisting Query
- Removing Columns from a Query
- Editing Column Parameters in a Query
- Changing the Order of Columns in a Query
- Adding Filters to a Query
- Editing Filters in a Query
- Ways of Comparing Data
- Removing Filters From a Query
- Results Window
- Application Data Structure
- Application Database Fields Alphabetical List
- Application Datatree
- Field Paths List for the iQ Tool
-
Adding Specimens to the Database
- Adding a Single Specimen using the Add Specimen Wizard
- Adding a Batch of Specimens using the Add Specimen Expert Tool
- Saving a Batch of Specimens to be added as a Work in Progress
- Finishing a Work in Progress Batch
- Printing Barcodes for a Specimens in a Batch added using the Add Specimen Expert Tool
- Customizing the Add Specimen Expert Tool to Streamline Specimen Batch Entry
- Changing which Box an Add Expert Template Points for Adding Storage
- Importing FFPE Samples from UUMC
- Entering and Editing Specimen Records
- Transformations
- Specimen Disbursement and Registration
- Reports and Records
- Adding a Pathology Report to a Specimen Record
- Performing a DEXT Import of a Pathology Import
- Checking on the status of your DEXT Import Request
- Adding a Medical Record to a Specimen Record
- Editing Patient or Collection Records
- Editing Collection Records
- Editing Patient Records
- Diagnoses
- Adding a Diagnosis to a Patient Record
- Linking an Existing Diagnosis to one or more Collections
- Linking a Collection to a Diagnosis
- Recording a Consent for a Patient
- Reviewing a Patient's Consents
- Uploading a Patient's Consent Form
- Managing Patient Consents
- External (to itBioPath) Data Sources
- Managing Dictionaries
-
Storage
- Editing Aliquots
- Connecting a Barcode Label Printer to itBioPath
- Removing a Barcode Label Printer from itBioPath
- Freezer Management
- Viewing the Contents of a Box in a Freezer
- Accessing the Specimen Record for the Specimen associated with an Aliquot
- Editing Box Details
- Adding a New Box to a Freezer from the Add Aliquot Window
- Managing Protocols, Projects, and Related User Permissions
- Window, Tab, and Field Descriptions
- Miscellaneous
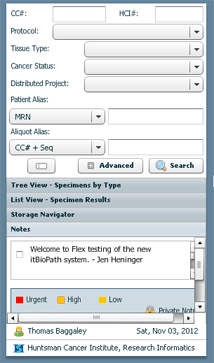
The itBioPath Search Pane is used to search for a list of specimens that meet a set of criteria. It also provides access to the Storage Navigator and the Notes modules. The actual appearance of the Search Pane will change depending on the context. The search pane will resize itself based on its contents. You can manually adjust the width of the pane by clicking and dragging on the handle on the ride side of the pane. You can also shrink the search pane completely against the left side of the window (getting it out of the way of the records displayed in the window) by double-clicking on that same handle. Double-clicking again will expand the pane back out to its regular size.


The search pane is divided into two parts. The upper part of the pane is used to enter search criteria to find a desired set of specimens. The most commonly used fields are displayed for the basic search. By clicking the Advanced button the search pane expands to display the entire list of searchable fields. This gives the user the ability to search the database for specimen records matching a wide variety of characteristics — see Performing an Advanced Search. Once the search criteria area has been expanded for an Advanced search, it may be returned to its smaller size by clicking on the Basic button, which appears in the lower right corner of the Advanced search criteria area. It should be noted, however, that any criteria entered on the Advanced search area will still be active and applicable to the search, even though the Basic search criteria display is being used. This is indicated in the Basic search area by a red circle icon with an explanation point that next to the Advanced and Search buttons.

To clear any previously entered search criteria (either in the Basic or Advanced search criteria display), simply click the button to the left of the Advanced button (and the red icon described above if it is present). This button clears all search options. Alternatively, select Search-Clear Search from the application menu.

The main function of the lower half of the pane is to display the results of the searches performed. These results can be displayed in either tree view or list view. Tree View displays the specimen results grouped by certain characteristics such as the type of specimen or tissue type. List View displays — or in a simple list of specimens or of patients from whom the returned specimens were collected (list view). Search results that return more than 1,000 specimens cannot be displayed in tree view. On the tree view, the user can select the particular type of grouping by clicking on a series of buttons at the bottom of the view. Possible groupings include: specimen type, tissue type, specimen status, tissue status, specimens from the same patient, or specimens from the same institution.

Likewise, the user can select whether a list of specimens or of patients is displayed in List View by selecting the appropriate button on the right side of that view.

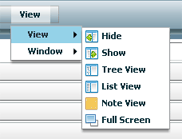
Switching between views can be performed by selecting the appropriate option from the View menu by clicking on the bar in the pane with the name of the desired view displayed on it.


In addition to displaying the results of a search, the bottom half of the search pane has additional views. The first of these additional views is the Storage Navigator. The Storage Navigator can be used to manage specimen storage in various freezers — see Freezer Management. The information in the Storage Navigator is static and not affected by search results. Users can record notes which are displayed in the Notes view. Notes may be public or private. Public notes may be seen by all itBioPath users but only deleted by the user that created the note. Private notes will only seen by the creator of the note. Notes may be categorized by importance (Urgent, High or Low) or whether the note deals with Business or is Personal. This categorization appears as a colored box to the left of each note. Click on the icon in the lower left corner of the Notes view to display a legend that specifies the meaning of note colors.


