- Welcome
- Use case
- Getting Started
-
Searching Records
- Performing a Basic Search
- Performing an Advanced Search
- Performing a List Search
- Performing a Keyword Search of UUMC Pathology Reports for all Patients in the Database
- Performing a Keyword Search of UUMC Pathology Reports for the Patients Associated with a Specific Set of Specimens
- Restrictions on Searches
- Reports
-
iQ Tool
- Adding Columns to a Query
- Starting the iQ Tool
- iQ Tool Window
- Current Query Data Group
- Saved Queries List
- Top Portion of the Selected
- Display or Report Columns Section
- Find/Filters Section
- Running a Preexisting Query
- Creating a Query
- Create Query Window
- Copying and Altering a Preexisting Query
- Removing Columns from a Query
- Editing Column Parameters in a Query
- Changing the Order of Columns in a Query
- Adding Filters to a Query
- Editing Filters in a Query
- Ways of Comparing Data
- Removing Filters From a Query
- Results Window
- Application Data Structure
- Application Database Fields Alphabetical List
- Application Datatree
- Field Paths List for the iQ Tool
-
Adding Specimens to the Database
- Adding a Single Specimen using the Add Specimen Wizard
- Adding a Batch of Specimens using the Add Specimen Expert Tool
- Saving a Batch of Specimens to be added as a Work in Progress
- Finishing a Work in Progress Batch
- Printing Barcodes for a Specimens in a Batch added using the Add Specimen Expert Tool
- Customizing the Add Specimen Expert Tool to Streamline Specimen Batch Entry
- Changing which Box an Add Expert Template Points for Adding Storage
- Importing FFPE Samples from UUMC
- Entering and Editing Specimen Records
- Transformations
- Specimen Disbursement and Registration
- Reports and Records
- Adding a Pathology Report to a Specimen Record
- Performing a DEXT Import of a Pathology Import
- Checking on the status of your DEXT Import Request
- Adding a Medical Record to a Specimen Record
- Editing Patient or Collection Records
- Editing Collection Records
- Editing Patient Records
- Diagnoses
- Adding a Diagnosis to a Patient Record
- Linking an Existing Diagnosis to one or more Collections
- Linking a Collection to a Diagnosis
- Recording a Consent for a Patient
- Reviewing a Patient's Consents
- Uploading a Patient's Consent Form
- Managing Patient Consents
- External (to itBioPath) Data Sources
- Managing Dictionaries
-
Storage
- Editing Aliquots
- Connecting a Barcode Label Printer to itBioPath
- Removing a Barcode Label Printer from itBioPath
- Freezer Management
- Viewing the Contents of a Box in a Freezer
- Accessing the Specimen Record for the Specimen associated with an Aliquot
- Editing Box Details
- Adding a New Box to a Freezer from the Add Aliquot Window
- Managing Protocols, Projects, and Related User Permissions
- Window, Tab, and Field Descriptions
- Miscellaneous
When you have several similar-type specimens to add to the database, you can more quickly add these specimens to the database by using the Add Specimen Expert tool. The Add Specimen Expert tool provides a table-based interface for entering the data for multiple specimens at the same time. This process is streamlined by hiding unused columns. The user will only interface with fields that apply to the specimens being collected. Different layouts of entry tables are stored in templates, which can be set up and customized by the user — see Customizing the Add Specimen Expert Tool. Templates may also specify default values that will be entered in some fields automatically. There may still be values that need manual adjustment when entering specific samples.
Before using the Add Specimen Expert tool, and certainly before attempting to customize a template, it is important to have a good understanding of the basic overall process for adding specimens — see Adding a Single Specimen Using the Add Specimen Wizard.To add a batch of specimens to itBioPath using the Add Specimen Expert Tool:
- Select Edit > Add Specimens > Add Specimen Expert from the menu bar at the top of the itBioPath application window. The Add Specimen Expert window will open.

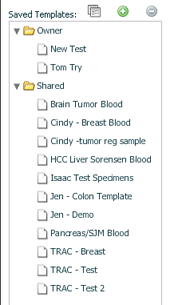
- Select the template that applies to the specimens you are entering from the list on the left side of the window. The right side of the window will show the selected template.

- Enter the data for the specimens you would like to add in the table on the template — one specimen per row.

-
To add a row to the bottom of the list of specimens to be entered, simply click on the + button above and to the right of the list of the Specimens grid. You can also remove unnecessary rows by selecting a row to delete and clicking on the — button.
-
You may copy the values from one row to the next (if the specimen for the new row has a lot of the same values as a previously entered specimen) by selecting the row to copy and clicking on the Copy Selected Specimen button.

- While you are working on entering a specimen, it may be difficult to see what data you have or haven't entered in a given row, since there are many columns and they will not all be visible at the same time. You can see a summary of what you have already entered in the current row by clicking on the specimen summary button.

-
At the very least, you should enter a Tissue Type (Collection Site) and a Specimen Type for each specimen to be added. These are required fields. You also must specify a Protocol and Institution (although these might be entered automatically when you select an existing collection ID).
-
As you finish each row and that specimen is ready to be added to the database, check the box at the beginning of that row. Any row that remains unchecked will not be added to the database.

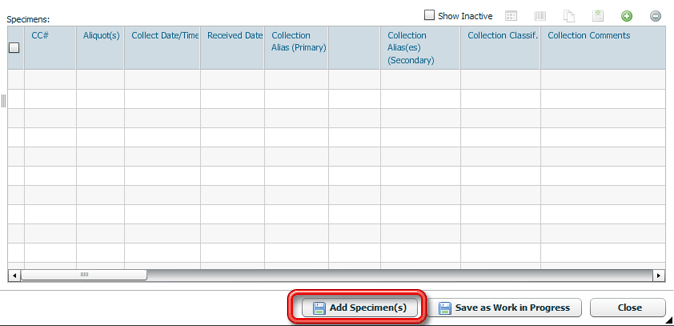
- Click the Add Specimen(s) button to add the entire batch of specimens to the database. The CC# field in each of the rows of the added specimens will be populated with the specimens' newly assigned Cancer Center number. In each row that is a new collection, a new Collection ID will be assigned, likewise for the HCI Person ID, if the patient is a new person in HCI's database.

If you have multiple specimens from the same new collection event and do not have an existing collection alias to link them together (such as the HCI Number), you should add just one of these specimens first, then once the new Collection ID has been generated, add the remaining samples with the correct Collection ID, see Customizing the Add Specimen Expert Tool to Streamline Specimen Batch Entry.
You may enter all the specimen data at once, of course, but check only one of the samples ready to add until you have the new Collection ID number. If you try to add all of the specimens from a single new collection event at once without providing some collection alias to indicate they belong together, they will each be given their own new Collection ID and therefore will not be treated as a single collection event in the database. If you have incomplete information on a batch of specimens, you may add that batch as a work in progress — see Saving a Batch of Specimens to be Added as a Work in Progress
This will save the batch in a format similar to the add specimen expert templates and allow you to later add the missing information. The main difference between a work in progress and a template is that once you have added the missing information and added the specimens from the work in progress as completed specimens to the database, the work in progress will be deleted. (It will only be used once, instead of multiple times like templates.) Other users within your group have access to work in progress records, so that another user can pick up where you left off and finish the batch.
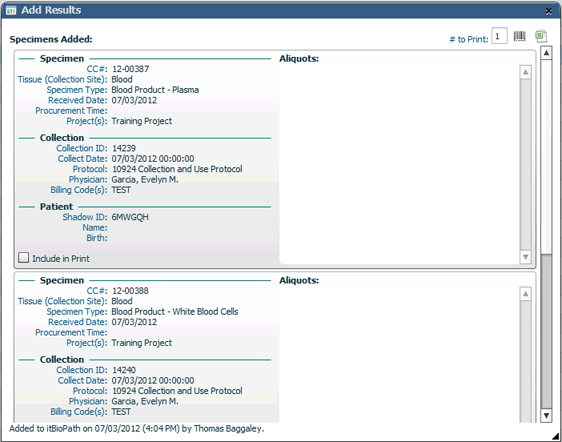
- Upon successfully adding the specimens to the database, the Add Results window will appear with a summary of the specimens added. This window allows you to also print barcodes for the specimens or export the summary in Excel spreadsheet format (see the upper right corner of the window). Close the window once you finished with the summary.


