- Welcome
- Use case
- Getting Started
-
Searching Records
- Performing a Basic Search
- Performing an Advanced Search
- Performing a List Search
- Performing a Keyword Search of UUMC Pathology Reports for all Patients in the Database
- Performing a Keyword Search of UUMC Pathology Reports for the Patients Associated with a Specific Set of Specimens
- Restrictions on Searches
- Reports
-
iQ Tool
- Adding Columns to a Query
- Starting the iQ Tool
- iQ Tool Window
- Current Query Data Group
- Saved Queries List
- Top Portion of the Selected
- Display or Report Columns Section
- Find/Filters Section
- Running a Preexisting Query
- Creating a Query
- Create Query Window
- Copying and Altering a Preexisting Query
- Removing Columns from a Query
- Editing Column Parameters in a Query
- Changing the Order of Columns in a Query
- Adding Filters to a Query
- Editing Filters in a Query
- Ways of Comparing Data
- Removing Filters From a Query
- Results Window
- Application Data Structure
- Application Database Fields Alphabetical List
- Application Datatree
- Field Paths List for the iQ Tool
-
Adding Specimens to the Database
- Adding a Single Specimen using the Add Specimen Wizard
- Adding a Batch of Specimens using the Add Specimen Expert Tool
- Saving a Batch of Specimens to be added as a Work in Progress
- Finishing a Work in Progress Batch
- Printing Barcodes for a Specimens in a Batch added using the Add Specimen Expert Tool
- Customizing the Add Specimen Expert Tool to Streamline Specimen Batch Entry
- Changing which Box an Add Expert Template Points for Adding Storage
- Importing FFPE Samples from UUMC
- Entering and Editing Specimen Records
- Transformations
- Specimen Disbursement and Registration
- Reports and Records
- Adding a Pathology Report to a Specimen Record
- Performing a DEXT Import of a Pathology Import
- Checking on the status of your DEXT Import Request
- Adding a Medical Record to a Specimen Record
- Editing Patient or Collection Records
- Editing Collection Records
- Editing Patient Records
- Diagnoses
- Adding a Diagnosis to a Patient Record
- Linking an Existing Diagnosis to one or more Collections
- Linking a Collection to a Diagnosis
- Recording a Consent for a Patient
- Reviewing a Patient's Consents
- Uploading a Patient's Consent Form
- Managing Patient Consents
- External (to itBioPath) Data Sources
- Managing Dictionaries
-
Storage
- Editing Aliquots
- Connecting a Barcode Label Printer to itBioPath
- Removing a Barcode Label Printer from itBioPath
- Freezer Management
- Viewing the Contents of a Box in a Freezer
- Accessing the Specimen Record for the Specimen associated with an Aliquot
- Editing Box Details
- Adding a New Box to a Freezer from the Add Aliquot Window
- Managing Protocols, Projects, and Related User Permissions
- Window, Tab, and Field Descriptions
- Miscellaneous
itBioPath records specimens' storage allows for grouping several storage containers together so that the amount stored can be managed both on the individual container level and on the group level. This helps determine how much of a specimen is available or if the specimen has been disbursed. Separations of a single specimen are referred to as aliquots. itBioPath provides a module that allows for maintenance and searching within a specific storage unit. This shows which specimens are available in a given location without having to physically inspect the storage itself.
Storage information is often added to a specimen record while that record is first being created. Aliquot information is available in the Aliquots grid of the Aliquots/Projects tab in the Specimen window. Information in the rows of the Aliquots grid indicates existing aliquot information for the specimen. To add new or additional Aliquot information :
- Open the specimen record for the specimen to which you would like to add aliquots. See Editing Specimen Records for instructions on how to do this.
- Select the Aliquots/Projects tab.
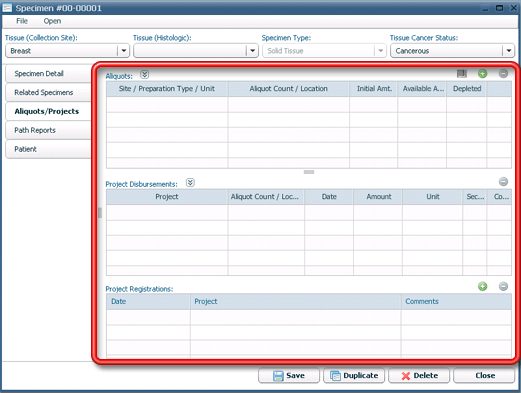
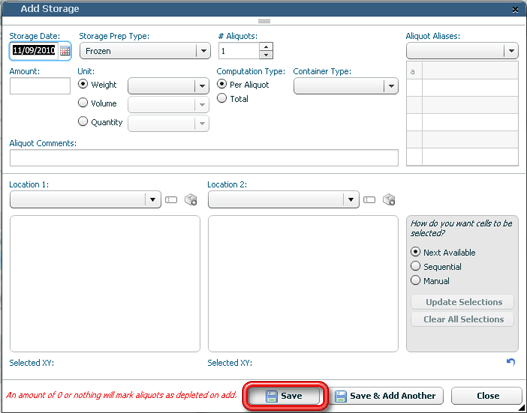
- Click the add button above the Aliquots list on the Aliquots/Projects tab. The Add Storage window will open.

- Enter the storage information for the new aliquot on the window.
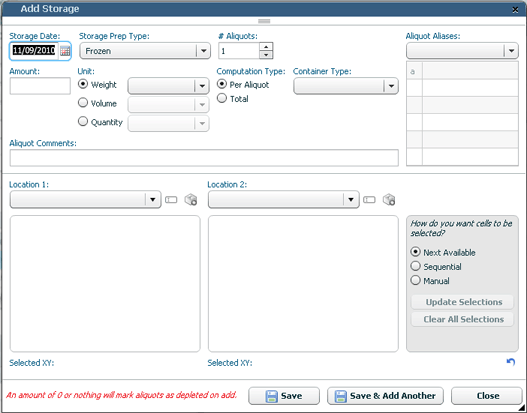
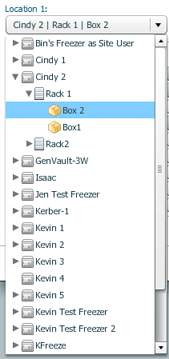
Click on the drop-down of Location 1 or Location 2. After activating the drop-down, all the freezers in itBioPath will appear. Click the arrow on the left side of the appropriate storage unit to reveal containers within that storage unit. It may be necessary to expand several layers as storage units may be divided into subsections, racks, and boxes. The individual aliquots will be stored in various cells within the selected box, identified by an XY coordinate. Click the clear button to clear any selected location in that field. Users with appropriate permissions can add a box to a freezer by clicking box with the add button.
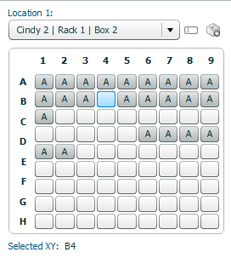
Once you have selected a box, the availability within that box will be displayed below the Location field. Cells that have an aliquot stored in them will be dark gray and filled with the letter A. Cells that are empty will be lighter gray and will not have a letter displayed in them. The cell(s) that are currently selected for storing the new aliquot(s) will be highlighted in blue. When the aliquot group has been added, the location of each aliquot's storage location will be displayed as a text string. The various storage divisions are separated by a vertical line (e.g. TRAC-1 | PJ1 | Box 1 | A1 to mean the TRAC-1 freezer, the PJ1 rack, in Box 1 at XY coordinate A1).
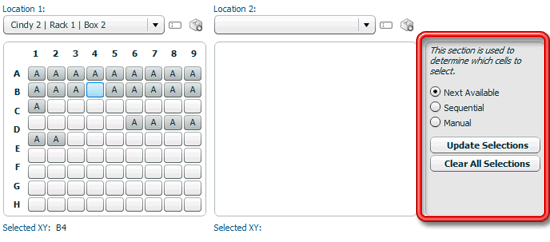
Selecting cells can be done using one of three methods. The selection options are available on the right side of the Add Storage window. The first selection indicates that itBioPath should just assign each aliquot to the Next Available cell in the box (moving from left to right along the rows and then downward). When Next Available is selected the aliquots may not be located together. The Sequential selection indicates that itBioPath should find the first group of cells that can hold all of the aliquots being recorded. A sequential group may continue on the next row and still be considered sequential. Manual selection involves clicking on the cells in the Location grid. To select multiple cells, CTRL+Click or SHIFT+Click using the keyboard and mouse. Holding down the SHIFT button selects all of the empty cells between the previously selected cell and the cell being clicked on. Shift+Click deselects any other previously selected cells that might not be a part of that series of cells. If you click on a cell in the box display, the selection method will automatically switch to Manual. To apply a specific selection method, select the appropriate radio button and click Update Selections.
- Click the Save button to add the new group of aliquots to the specimen record.
