- Welcome
- Use case
- Getting Started
-
Searching Records
- Performing a Basic Search
- Performing an Advanced Search
- Performing a List Search
- Performing a Keyword Search of UUMC Pathology Reports for all Patients in the Database
- Performing a Keyword Search of UUMC Pathology Reports for the Patients Associated with a Specific Set of Specimens
- Restrictions on Searches
- Reports
-
iQ Tool
- Adding Columns to a Query
- Starting the iQ Tool
- iQ Tool Window
- Current Query Data Group
- Saved Queries List
- Top Portion of the Selected
- Display or Report Columns Section
- Find/Filters Section
- Running a Preexisting Query
- Creating a Query
- Create Query Window
- Copying and Altering a Preexisting Query
- Removing Columns from a Query
- Editing Column Parameters in a Query
- Changing the Order of Columns in a Query
- Adding Filters to a Query
- Editing Filters in a Query
- Ways of Comparing Data
- Removing Filters From a Query
- Results Window
- Application Data Structure
- Application Database Fields Alphabetical List
- Application Datatree
- Field Paths List for the iQ Tool
-
Adding Specimens to the Database
- Adding a Single Specimen using the Add Specimen Wizard
- Adding a Batch of Specimens using the Add Specimen Expert Tool
- Saving a Batch of Specimens to be added as a Work in Progress
- Finishing a Work in Progress Batch
- Printing Barcodes for a Specimens in a Batch added using the Add Specimen Expert Tool
- Customizing the Add Specimen Expert Tool to Streamline Specimen Batch Entry
- Changing which Box an Add Expert Template Points for Adding Storage
- Importing FFPE Samples from UUMC
- Entering and Editing Specimen Records
- Transformations
- Specimen Disbursement and Registration
- Reports and Records
- Adding a Pathology Report to a Specimen Record
- Performing a DEXT Import of a Pathology Import
- Checking on the status of your DEXT Import Request
- Adding a Medical Record to a Specimen Record
- Editing Patient or Collection Records
- Editing Collection Records
- Editing Patient Records
- Diagnoses
- Adding a Diagnosis to a Patient Record
- Linking an Existing Diagnosis to one or more Collections
- Linking a Collection to a Diagnosis
- Recording a Consent for a Patient
- Reviewing a Patient's Consents
- Uploading a Patient's Consent Form
- Managing Patient Consents
- External (to itBioPath) Data Sources
- Managing Dictionaries
-
Storage
- Editing Aliquots
- Connecting a Barcode Label Printer to itBioPath
- Removing a Barcode Label Printer from itBioPath
- Freezer Management
- Viewing the Contents of a Box in a Freezer
- Accessing the Specimen Record for the Specimen associated with an Aliquot
- Editing Box Details
- Adding a New Box to a Freezer from the Add Aliquot Window
- Managing Protocols, Projects, and Related User Permissions
- Window, Tab, and Field Descriptions
- Miscellaneous
To add a single specimen to itBioPath using the Add Specimen Wizard:
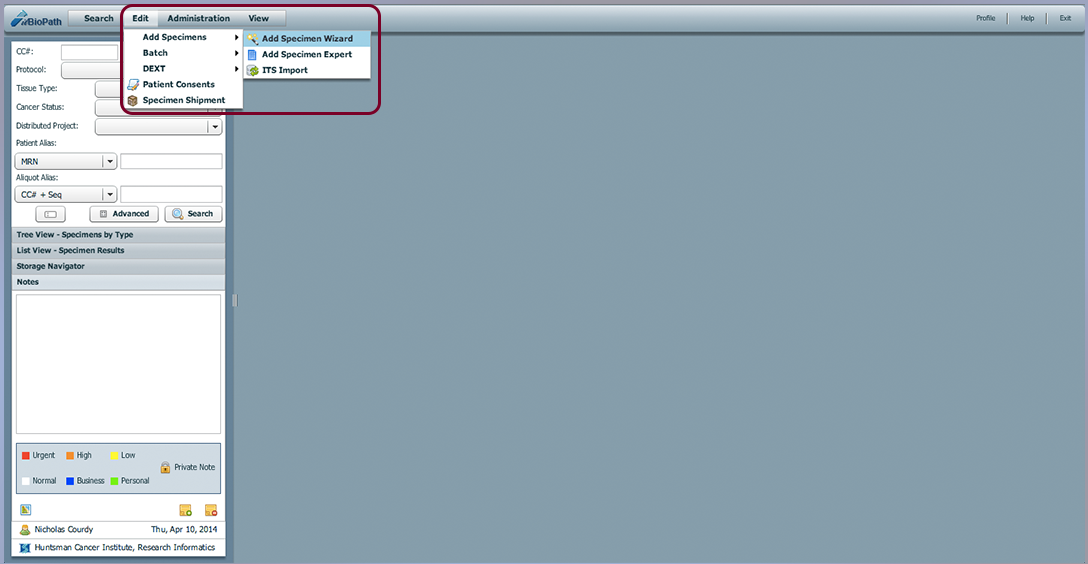
- Navigate to Edit > Add Specimens > Add Specimen Wizard from the menu bar at the top of the itBioPath application window. This will launch the wizard.
-
Select the protocol under which the specimen was collected using the dropdown. (Rare case: If the protocol is currently inactive, you may need to click on the Show inactive protocols? checkbox for the protocol to appear in the protocols list.)
-
Associate a project or projects by selecting the projects from the list and clicking Add Projects. The projects will now appear in the Selected Project(s) section. Select a project from the Selected Project(s) section and click Remove Project(s) to remove it. *For the remainder of the wizard, the information you are able to see (e.g., patient names and other identifying information) will be based on your permissions in the database relative to the protocol selected and project(s) registered. — see Frequently Asked Questions About itBioPath for more information about protocol and project-based permissions.
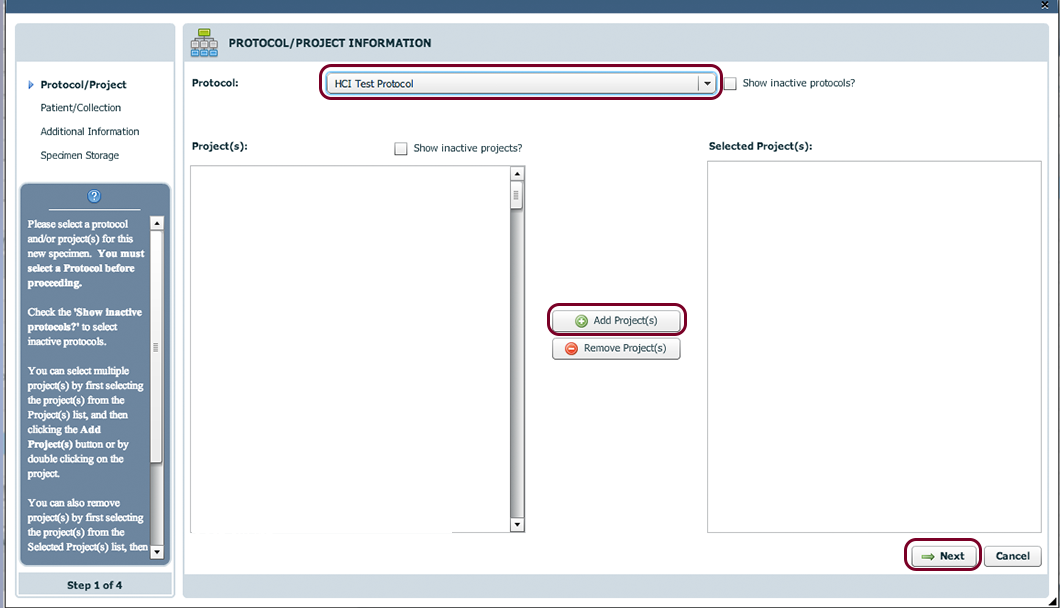
- Click Next to move to the second step of the Add Specimen Wizard.
- If you have a collection alias for the specimen, such as a Biopsy Number, an HCI Number or a itBioPath Collection ID, that has already been assigned to the collection event the specimen is associated with:
- Select the collection alias type and enter the ID number in the first row of the Collection Information area of the second page of the wizard.
- Click on the button with the magnifying glass icon next to the Collection Alias field (the Find Collection button).
- If another specimen from the collection event has been previously entered into the database, itBioPath will automatically populate both the collection and the patient information on the second page of the wizard.
- If no prior specimen from the collection event has been entered into itBioPath, you will be informed of this by a dialog. You will need to create the new collection event record yourself. (If the alias entered is not a Collection ID, the ID you entered will remain in the Collection Alias field so that when you create the new collection event, the specified ID will be included in the new collection record.) *If you are using a Collection ID to search for an existing collection, and no collection is found, you should double-check the ID to make sure you have entered the correct value, because Collection ID's are automatically assigned by itBioPath to new collection records when they are created. Unlike other collection aliases, Collection ID's cannot be manually assigned. In order for the Collection ID to exist and be valid, a collection event with that automatically assigned ID has to have been added to itBioPath at some point previously.
-
Click OK to clear the dialog. If you have a different collection ID, try repeating this step with the other ID unless you are certain this is a new collection event. Once you are convinced this is a new collection event, proceed to step #6. You will add the new collection event later in this process.
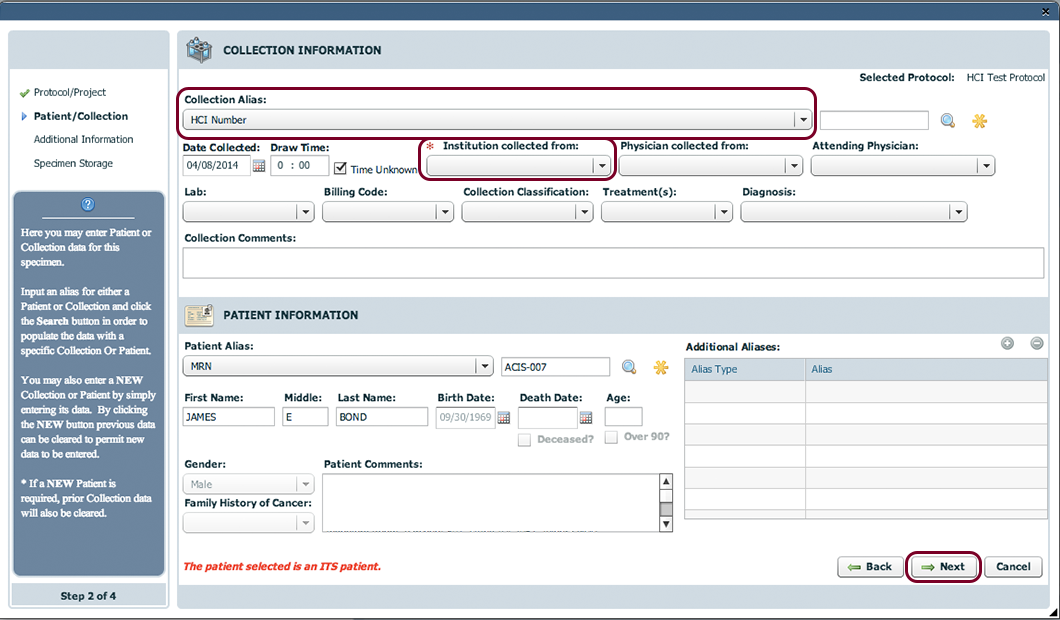
- If you have a patient alias for the patient the specimen was collected from:
- Select the patient alias type and enter the ID number in the first row of the Patient Information area of the second page of the wizard.
- Click on the button with the magnifying glass icon next to the Patient Alias field (the Find Patient button).
- If another specimen collected from this patient has been previously entered into the database, itBioPath will automatically populate the patient information fields in the wizard. The Available Collections field will also appear in the Collection Information area of the window. The dropdown options in this field will include the Collection IDs of all of the collection events from this patient that occurred under the protocol entered in step #2 above. Skip to step #9.
- If no specimen associated with this patient ID has been entered into the database previously, a dialog will appear informing you that the Patient ID has not been found, meaning it is likely that you will need to add the patient record to itBioPath yourself. (Just as with the Collection ID for collections, if the alias entered is not a HCI Person ID, MRN or itBioPath Shadow ID, the ID you entered will remain in the Patient Alias field so that when you create the new patient record, the entered ID will be included in the patient record.) You may try to repeat this step with any additional patient ID's you might have. Once you are certain the patient has not been added to itBioPath previously, proceed to step #7. Unlike other patient ID numbers, specific HCI Person ID's, MRN's and itBioPath Shadow ID's cannot be manually assigned to new patient records.
- If the patient the specimen is associated with is a new patient — one that does not even have an MRN assigned — click on the button with an asterisk next to the Find Patient button in the Patient Information area — this is the add patient button. This will activate the data fields in the Patient Information area so that you can enter the new patient's information.
- Enter the appropriate information about the new patient in the data fields in the Patient Information area.
- Check the patient's existing collection records (if there are any) by selecting the different options in the Available Collections field and seeing if any of these collection records match the collection event for the current specimen. If the collection record exists, select that record in the Available Collections field and skip to step #12. If it doesn't exist, proceed to step #10. *Step #10 technically does not apply to newly created patient records, since there will be no collection records for new patients yet.
- Create a new collection event by clicking on the button with an asterisk next to the Find Collection button in the Collection Information area — this is the add collection button. This will activate the data fields in the Collection Information area so that you can enter the new collection information.
- Fill in the appropriate collection information in the fields in the Collection Information area.
- Click Next to move to the third step of the Add Specimen Wizard.
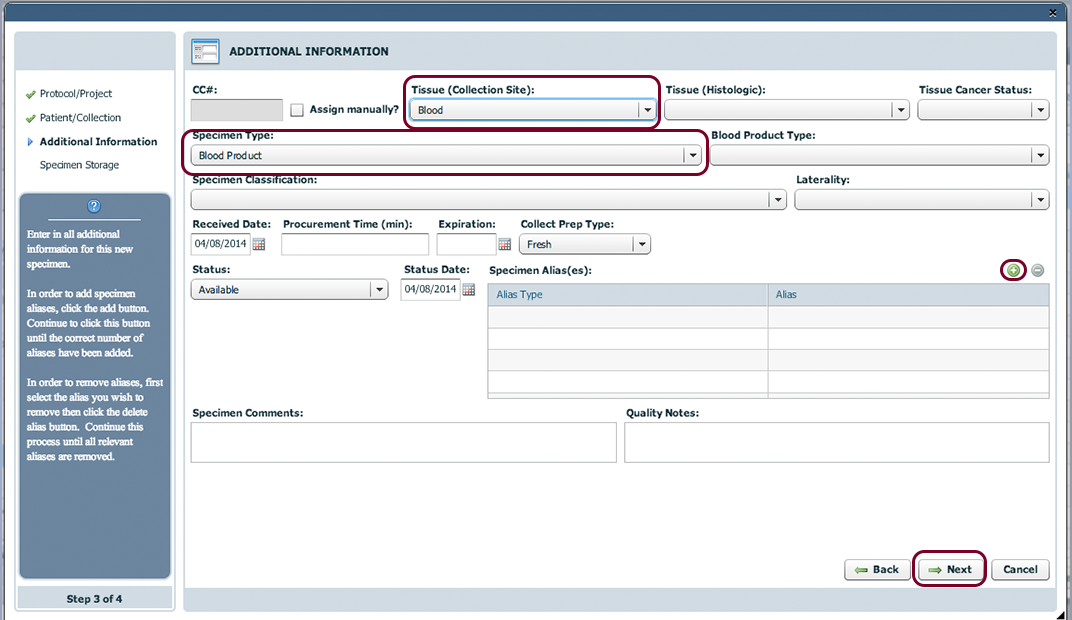
- Record the additional information requested about the sample on the third page of the Add Specimen Wizard. *The Tissue Type (Collection Site) field is a required field and a tissue type must be collected in that field or you will not be able to add the specimen to the database.
- Click Next to move to the fourth step of the Add Specimen Wizard.
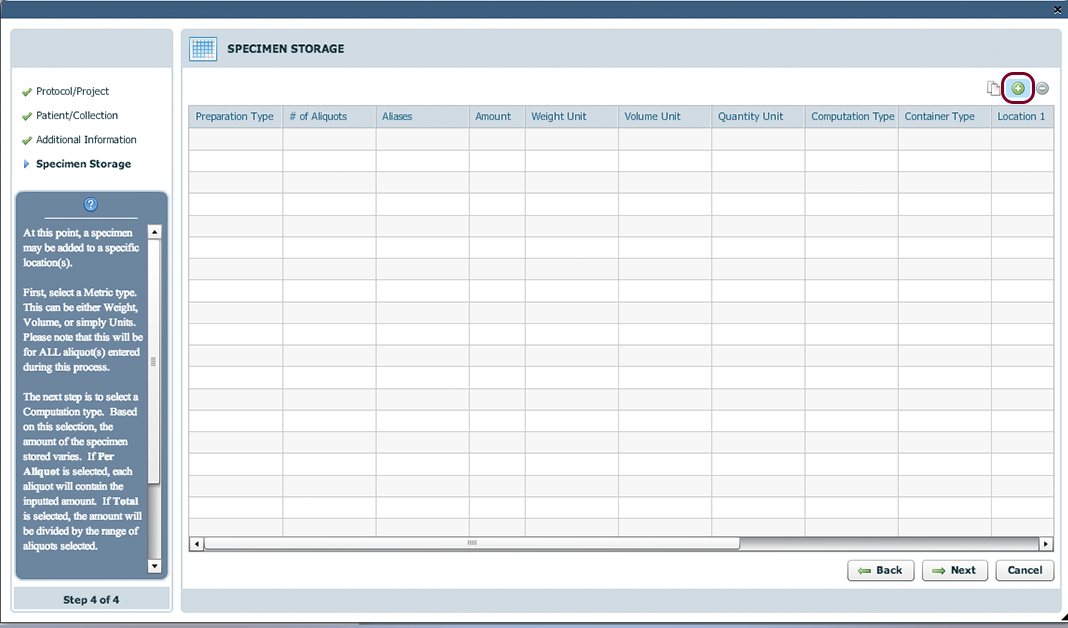
- The Specimen Storage step of the Add Specimen Wizard defines what freezer the new specimen will be stored in. Click the + to open the Add Storage window
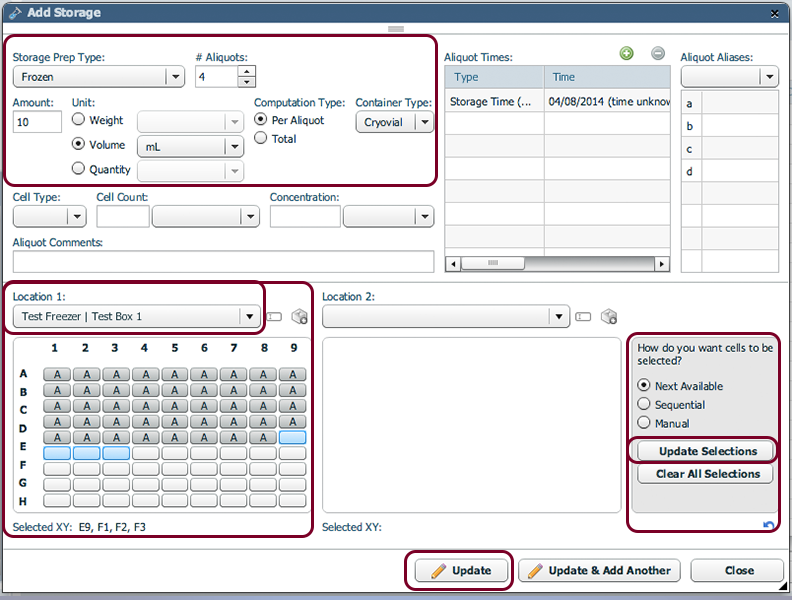
- The Add Storage window includes the quantity of the specimen collected and the # of aliquots to store. Allocate the correct freezer, box, and location by choosing from the location drop-down. itBioPath will automatically choose the next available open spots to store the aliquots. Aliquots will be stored together by choosing Sequential and clicking Update Selections. Select Manual and use Control+Click or Shift+Click to determine what slots the aliquots are stored in. Once all the information is correct click Update.
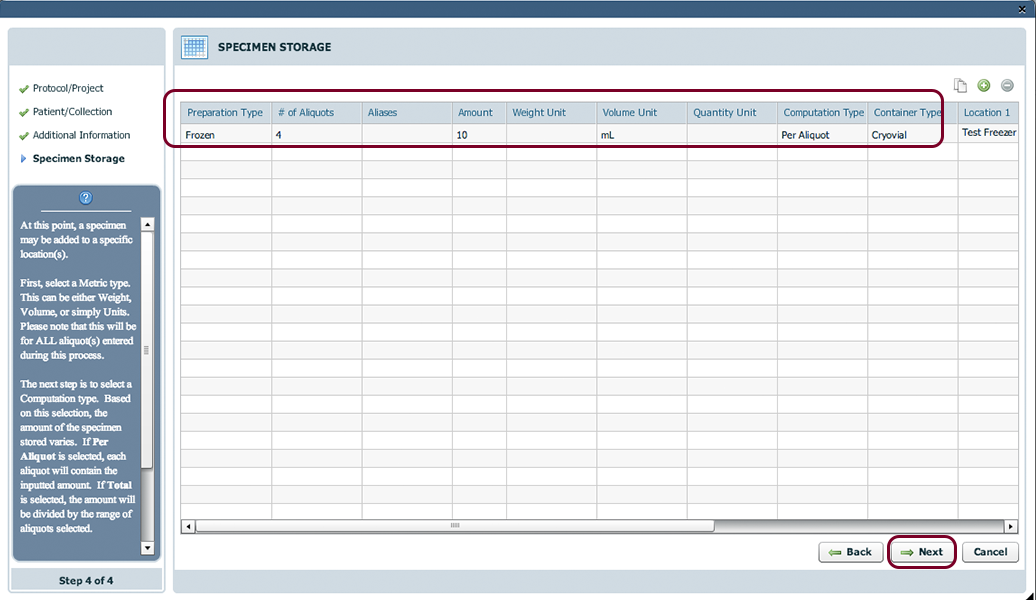
- Once the storage information is updated, the Add Storage window will close and the newly entered information will be visible in the Specimen Storage window. If the information is correct, click Next.
- Review the Summary page to make sure that the information entered is correct.
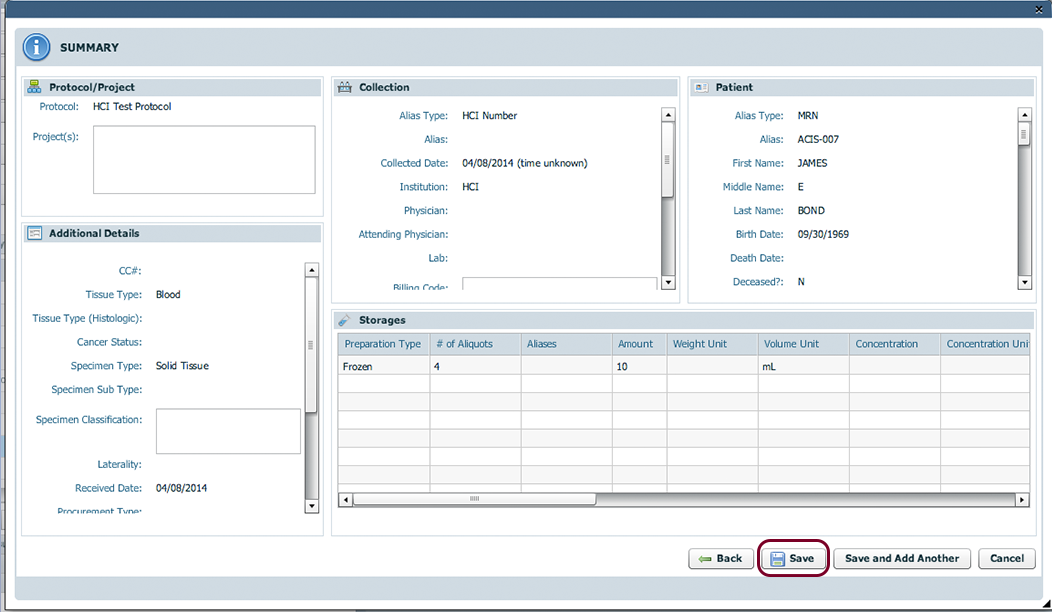
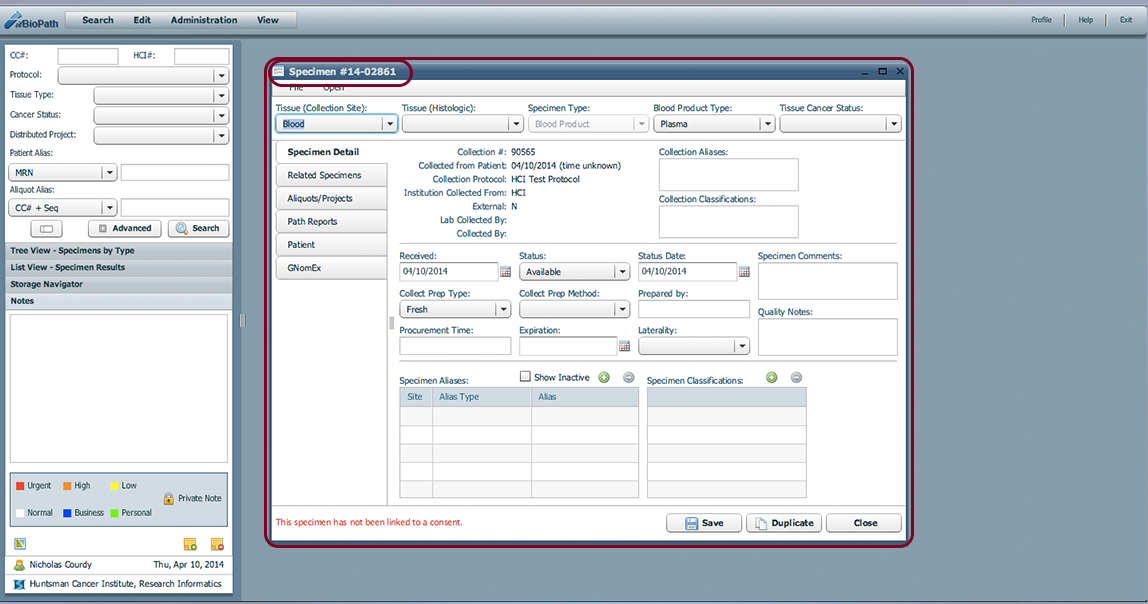
- Click Save to complete the wizard and add the specimen to the database. The wizard will close and open the newly created specimen in a Specimen window
You may click Save and Add Another if you have additional specimens to add. If you do click Save and Add Another, a dialog will appear to confirm that the specimen has been added to the database and to report the CC# assigned to the new specimen. Click OK to clear the dialog. The protocol, collection and patient information will show default values that are the same as the specimen just entered, given that many times users will want to record another specimen from the same collection event. However, any of these values may be changed, should it be necessary for the next specimen.


