- Welcome
- Use case
- Getting Started
-
Searching Records
- Performing a Basic Search
- Performing an Advanced Search
- Performing a List Search
- Performing a Keyword Search of UUMC Pathology Reports for all Patients in the Database
- Performing a Keyword Search of UUMC Pathology Reports for the Patients Associated with a Specific Set of Specimens
- Restrictions on Searches
- Reports
-
iQ Tool
- Adding Columns to a Query
- Starting the iQ Tool
- iQ Tool Window
- Current Query Data Group
- Saved Queries List
- Top Portion of the Selected
- Display or Report Columns Section
- Find/Filters Section
- Running a Preexisting Query
- Creating a Query
- Create Query Window
- Copying and Altering a Preexisting Query
- Removing Columns from a Query
- Editing Column Parameters in a Query
- Changing the Order of Columns in a Query
- Adding Filters to a Query
- Editing Filters in a Query
- Ways of Comparing Data
- Removing Filters From a Query
- Results Window
- Application Data Structure
- Application Database Fields Alphabetical List
- Application Datatree
- Field Paths List for the iQ Tool
-
Adding Specimens to the Database
- Adding a Single Specimen using the Add Specimen Wizard
- Adding a Batch of Specimens using the Add Specimen Expert Tool
- Saving a Batch of Specimens to be added as a Work in Progress
- Finishing a Work in Progress Batch
- Printing Barcodes for a Specimens in a Batch added using the Add Specimen Expert Tool
- Customizing the Add Specimen Expert Tool to Streamline Specimen Batch Entry
- Changing which Box an Add Expert Template Points for Adding Storage
- Importing FFPE Samples from UUMC
- Entering and Editing Specimen Records
- Transformations
- Specimen Disbursement and Registration
- Reports and Records
- Adding a Pathology Report to a Specimen Record
- Performing a DEXT Import of a Pathology Import
- Checking on the status of your DEXT Import Request
- Adding a Medical Record to a Specimen Record
- Editing Patient or Collection Records
- Editing Collection Records
- Editing Patient Records
- Diagnoses
- Adding a Diagnosis to a Patient Record
- Linking an Existing Diagnosis to one or more Collections
- Linking a Collection to a Diagnosis
- Recording a Consent for a Patient
- Reviewing a Patient's Consents
- Uploading a Patient's Consent Form
- Managing Patient Consents
- External (to itBioPath) Data Sources
- Managing Dictionaries
-
Storage
- Editing Aliquots
- Connecting a Barcode Label Printer to itBioPath
- Removing a Barcode Label Printer from itBioPath
- Freezer Management
- Viewing the Contents of a Box in a Freezer
- Accessing the Specimen Record for the Specimen associated with an Aliquot
- Editing Box Details
- Adding a New Box to a Freezer from the Add Aliquot Window
- Managing Protocols, Projects, and Related User Permissions
- Window, Tab, and Field Descriptions
- Miscellaneous
itBioPath's dictionaries control the choices presented in various drop-down fields throughout the application. Users with an appropriate role in itBioPath may add, delete or edit dictionary entries. Users without an appropriate role assigned are not able to access the Dictionary Manager. If you do not have the appropriate permissions to change dictionaries but would like changes made to the options in a particular drop-down field, please contact Research Informatics. There is an approval process for specific changes. Alterations to specific dictionaries may impact other users of the application.
itBioPath actually has three sets of dictionaries. The BST Dictionary set contains those dictionaries that apply to most of the drop-down fields in the application. The Pathology Dictionary controls drop-down options available in fields that appear on the Path Report window only. The Patient Dictionary currently only contains dictionaries that control options available in drop-downs associated with patient ethnicity and race as such values are stored in patient tables that are also accessed by other databases (such as CCR) that Research Informatics has developed.
To manage one of itBioPath's Dictionaries:
- Open the Dictionary Editor by selecting Administration-Dictionaries-[Name of the Appropriate Dictionary Set] in the application menu bar.

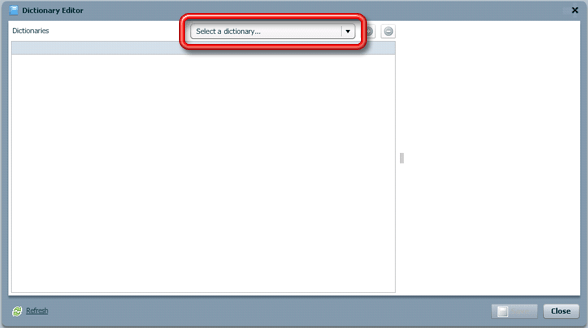
- Select the specific dictionary to manage in the drop-down at the top of the window. The list of dictionary values will appear in the window.

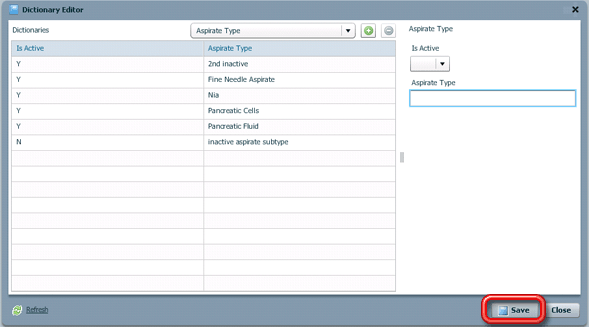
- Make appropriate changes to the list of values in the window. Potential changes include:
- Adding a new value to the list by clicking
 above the list and entering the new value in the field that appears to the right of the dictionary list.
 - Activating or deactivating a dictionary entry by selecting the entry in the list by changing the Is Active value for that entry. (Inactive entries will no longer appear as options in the appropriate drop-down field, although records that previously had that value will remain unchanged.)
- Deleting a dictionary entry by selecting the entry in the list and clicking on the
 button above the list. (This can only happen if there are no existing records with that value selected. Deactivating entries that are no longer being used is preferable to actually deleting them.)
 - Editing a dictionary entry by selecting it, then making the appropriate changes in the entry text that appears to the right of the dictionary list.
- Adding a new value to the list by clicking
- Click
 to save the changes you have made to the dictionary.

- Update the drop-down fields in the application with all of the current dictionary settings by selecting Administration-Dictionaries-Refresh All in the application menu. This will update the drop-down fields with the changes just made and any other changes made by you or other users since you started the application (or refreshed). If the dictionaries are not refreshed, these changes will automatically be reflected in the appropriate drop-down fields the next time you log in to the application.


