- Welcome
- Introduction
- Publications and presentations
- Signing in
- System requirements
-
How To
- Logging into GNomEx
- Submitting an experiment request
- Submitting a microarray hybridization request
- Submitting a sample quality request
- Submitting a sequencing request
- Requesting that microarray hybridization or sequencing be performed on samples previously submitted to sample quality testing
- Adding lanes to a previously submitted sequencing request
- Registering an external experiment in GNomEx
- Finding and viewing a summary of an experiment
- Editing an experiment
- Downloading experiment results
- Linking the samples from an experiment to their BST sample
- Viewing analyses
- Downloading analyzed data files
- Viewing a description of the materials and the methods used during processing of a specific kind of experiment
- Performing a search for experiments and analyses meeting a specific type of criteria
- Submitting a work authorization
- How pricing and billing works in GNomEx
- Adding a new price criterion
- Creating a new price sheet
- Creating a new price category
- Modifying an existing price sheet
- Modifying an existing price category
- Modifying an existing charge item
- Preparing and sending out invoices for clients
- Generating general ledger interface data for automatically billing university accounts
- Window, Tab, and Field Descriptions
-
GNomEx Error Messages and Information Windows
- Are you sure you want to delete all the hybridizations?
- Are you sure you want to delete all of the samples?
- At least one non-empty file must be selected in order for download to proceed.
- Please enter all of the required fields for the hybridization.
- Please enter all required fields for the samples.
- Please enter at least one search criterion.
- Please select a price category.
- Please select a price sheet.
- Remove all hybs currently showing in the list?
- Remove all samples currently showing in the list?
- The number of samples to setup has changed. Do you want to clear out the existing samples?
- The request has not been saved. Are you sure you want to quit?
- The request is now assigned to project.
- The webpage you are viewing is trying to close the window.
- Unable to generate GL interface. Cannot find approved folder.
- You are no longer logged on. Please logon again.
- Your changes have not been saved. Are you sure you want to exit?
-
Working With the List of Samples Submitting for Microarray Hybridization
- Adding a Sample to the List of Samples You Will Be Submitting for Microarray Hybridization
- Adding a sample to the list of samples you will be submitting for microarray hybridization that is similar to another sample already in the list
- Deleting a sample from the list of samples you will be submitting for microarray hybridization
- Deleting all of the samples currently included in the list of samples you will be submitting for microarray hybridization
-
Working With the List of Hybridizations By Requests
- Adding a hybridization to the list of hybridizations you will be requesting
- Adding a hybridization to the list of hybridizations you will be requesting that is similar to another hybridization already in the list
- Deleting a hybridization from the list of hybridizations you will be requesting
- Deleting all of the hybridizations currently included in the list of hybridizations you will be requesting
- Editing a hybridization from the list of hybridizations you will be requesting
- Working with the list of hybridizations you will be requesting
- The hybs tab (submit microarray hybridization request window)
- The submit microarray hybridization request window
- Submitting a microarray hybridization request
- Microarray hybridization requests
-
Specialized Role Topics
- Uploading a sample sheet
- Setting/changing the prices of a charge item
- Setting/changing the experiment type(s) associated with a price sheet
- Setting/changing the criteria by which a charge item will be applied to billing for an experiment
- The sample view tab (new experiment module)
- The hyb setup tab (new experiment request module)
- The hyb view tab (new experiment request module)
- The new project window
- The edit project window
- Adding a new project while you are entering a microarray hybridization request
- Editing an existing project while entering a microarray hybridization request
- Adding a new sample characteristic for annotation while submitting a sample hybridization
- Editing an existing sample characteristic for annotation while submitting a sample hybridization
-
Guides
- User Guide
- Experiment orders
- The foundation of GNomEx
- Experiments at a glance
- Submitting a HiSeq or MiSeq experiment order
- ABI Capillary (Sanger) Sequencing
- Checking on experiment progress
- Copy and pasting into samples grid
- Posting outside experiment data
- iScan experiments
- Downloading and uploading your data
- The download files window
- Downloading large data sets
- Downloading chromatograms
- Fast data transfer from the command line
- Troubleshooting guide for downloading
- Launching FDT with Webstart
- Uploading your data
- Annotating your experiment
- Associating experiment files back to the samples
- Sample annotations
- Copy and paste for the samples grid
- Bulk sample sheet import
- Analysis and data tracks
- Create an analysis
- Data tracks
- Disk usage
- Configuring GNomEx
- Context-sensitive help
- Customize the billing account fields
- Dictionaries
- Seq lib protocols and barcode schemes
- Configuring HiSeq rapid mode sequencing options
- Developer Guide
- Installation Guide
- Configuring GNomEx for FDT
- Configuring GNomEx to use LDAP Authentication
- Compiling and Building
- The Database Schema
- GNomEx Open Source
- Developer Documents
- Illumina HiSeq Realtime Info — The Metrix Server
- FAQs
- Demo
To submit a sample quality request to HCI's Microarray and Genomic Analysis Core Facility:
1. Start the GNomEx request submission wizard by clicking on either the Submit Experiment Request button in the Experiments section of the home page of the application environment or the smaller button with the same label along the top row of the application.
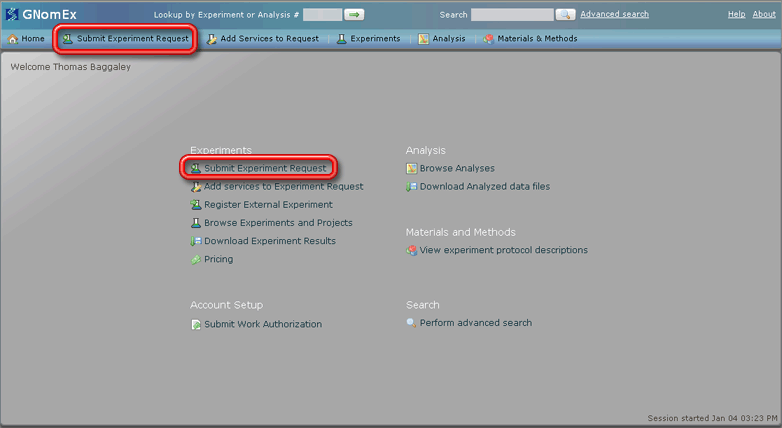
The New Experiment Request module will open with the Experiment setup tab selected.
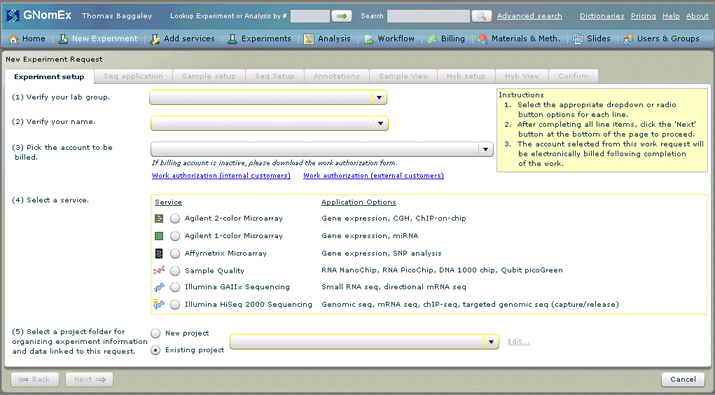
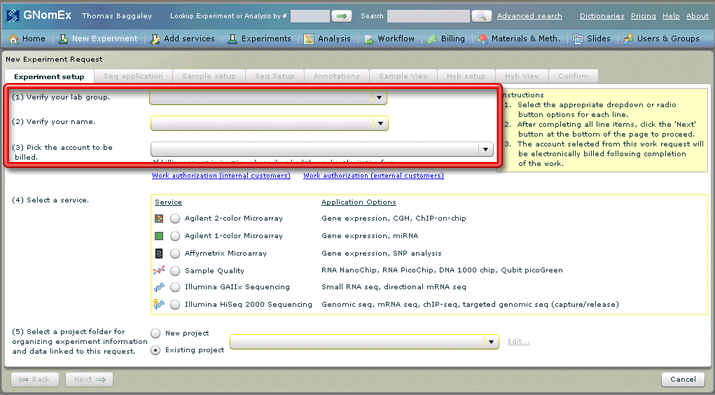
2. Select the appropriate lab group, your name and the appropriate account number in the three drop-down fields at the top of the Experiment setup tab.
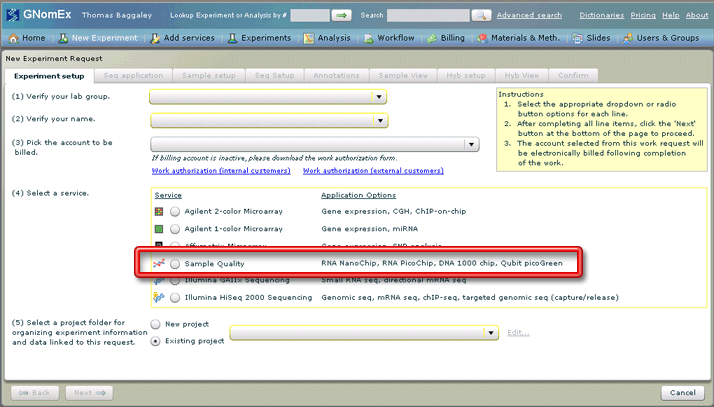
3. Select Sample Quality from among the (4) Select a service radio buttons.
4. Do one of the following as appropriate:
- If your experiment is part of an existing project, select that project in the drop-down field at the bottom of this tab.
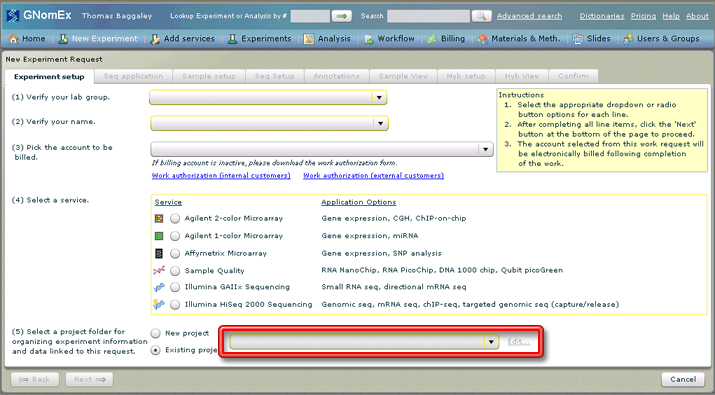
- If your experiment is part of a new project (or in other words there are no other experiments in the system assigned to this project), select the New project radio button. The New Project window will appear. Enter the appropriate project information on the window and click the Save button. (See Adding a New Project While You Are Entering a Microarray Hybridization Request for more information.) The New Project window will close and this new project will automatically be selected in the project drop-down field.
The experiment information and data for services for the same project will be stored together in the experiment repository, so this allows you to organize your experiments appropriately.
You may also edit an existing project at this point as well — see Editing an Existing Project While You Entering a Microarray Hybridization Request.
5. Click on the Sample Setup tab or click on the Next button at the bottom left side of the window.
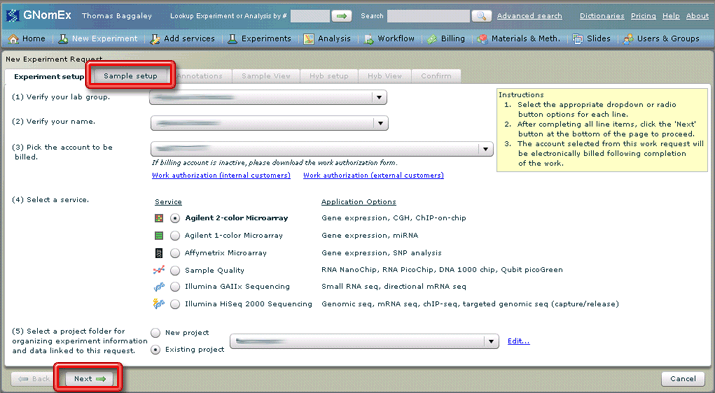
The Sample Setup tab will be selected.
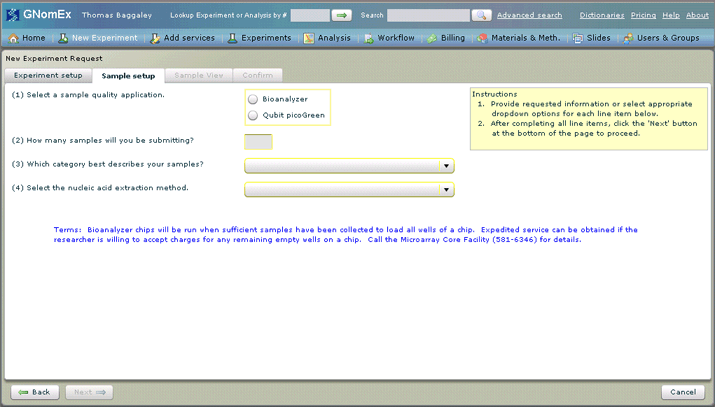
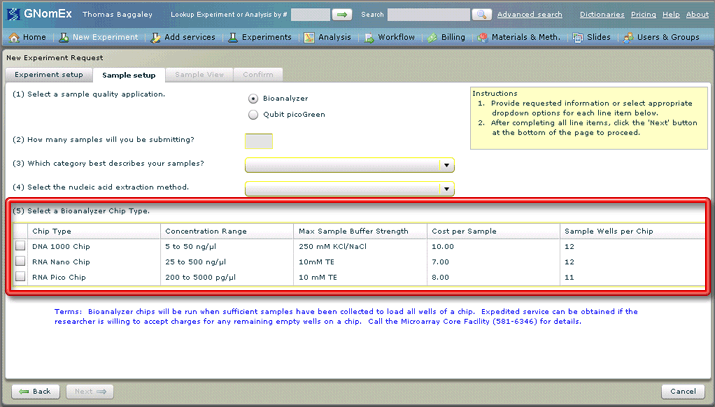
6. Enter the number of samples you are submitting and select the sample quality application, category and nucleic acid extraction method that apply to request in the fields on the Sample setup tab.
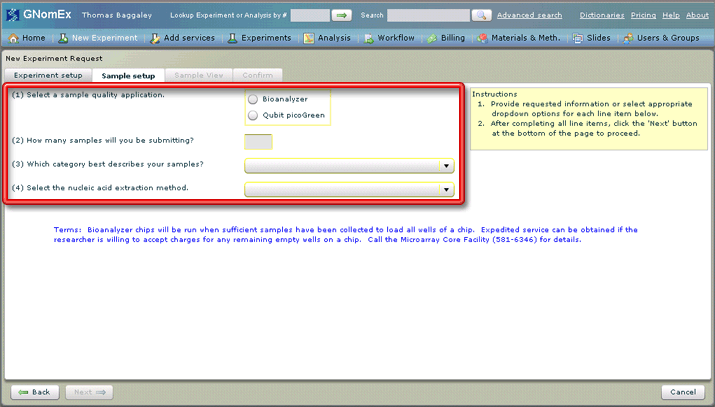
A default value will be selected for the nucleic extraction method based on the category selected, but you can still select a different method if appropriate. The options available in that field will depend on the category selected.
7. If you selected the Bioanalyzer application, select the Bioanalyzer Chip Type to be used.
8. Click on the Sample View tab or click on the Next button at the bottom left side of the window.
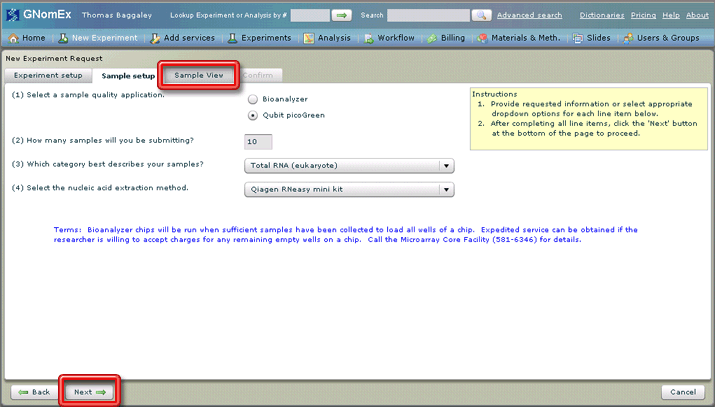
The Sample View tab will be selected.
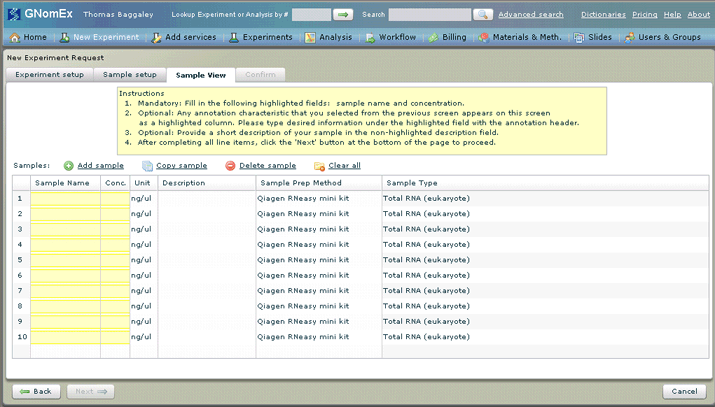
9. Enter/edit the appropriate data about each of the samples you will be submitting in the grid on the Sample View tab. See The Sample View Tab (New Experiment Request Module) for a description of the grid and its associated buttons and columns. Also see Working With the List of Samples You Will Be Submitting for Microarray Hybridization for specific instructions to tasks related to this list of samples.
There will already be some samples appearing in the grid on the Sample View tab. The information entered in these samples (including the number of samples appearing in the grid) is based on the data entered previously in the process. However, you can still make changes to this list as required, including adding and removing samples to/from the list. In most cases, you will simply need to provide the missing required information about each of the samples to the rows already appearing in the grid — see Editing a Sample from the List of Samples You Will Be Submitting for Microarray Hybridization.
Required fields that do not have any data entered in them yet will appear with a yellow background until data is entered. These required fields include the Sample Name and Concentration. You will not be able to move on to the next step in the request process until there are no more fields with a yellow background in the grid.
If you have multiple samples to enter and the information about these samples is already recorded in a spreadsheet, you may upload that spreadsheet to have the values entered automatically instead of having to enter them manually — see Uploading a Sample Sheet.
10. Click on the Visibility tab or click on the Next button at the bottom left side of the window.
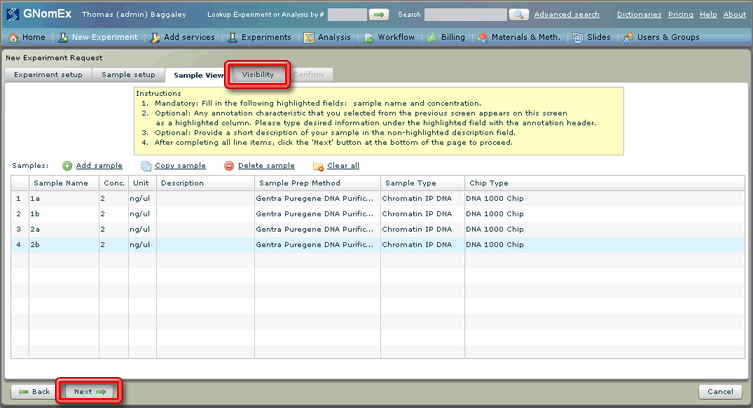
The Visibility tab will be selected.
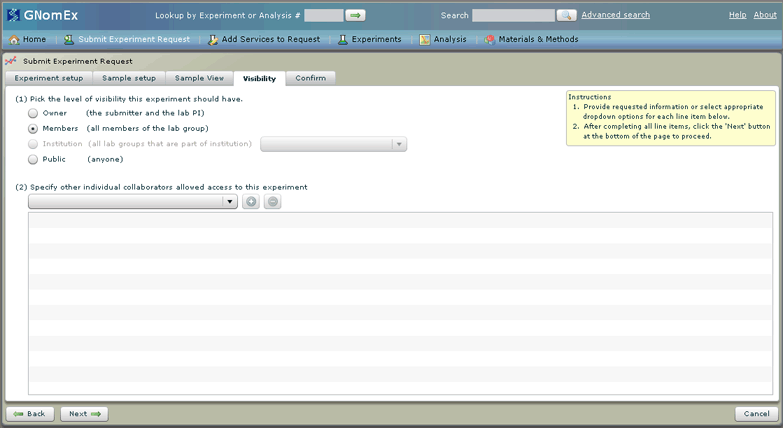
11. (Optional) Change the level of the visibility of the experiment by selecting the appropriate radio button (indicating whether the experiment should only be visible to the submitter and lab PI, to all the members of the lab group, any lab group at a specified institution, or anyone at all) and/or adding specific collaborators to the list at the bottom of the window by selecting their name in the dropdown field and clicking on the plus button next to that field.
This tab controls who will be able to see the experiment results and analysis in GNomEx. These settings can be changed later in the Experiments module.
12. Click on the Confirm tab or click on the Next button at the bottom left side of the window.
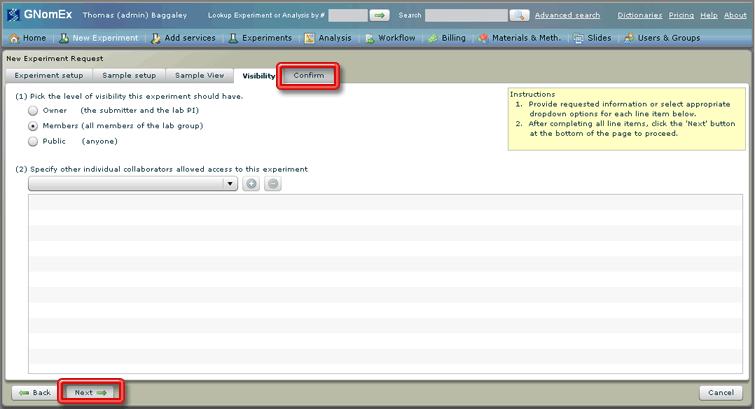
The Confirm tab will be selected.
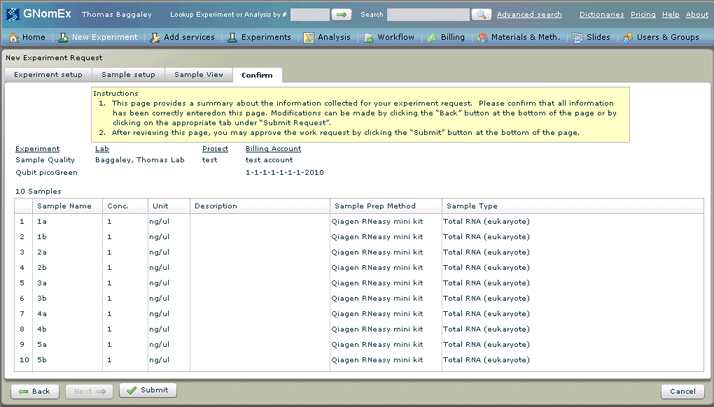
13. Review the request summary information as displayed on the window to make certain it is correct. If changes are needed, correct them by returning to the applicable tab. 14. Once you are satisfied that your request is entered correctly, click on the Submit button on the bottom left side of the window. The request will be submitted to the HCI Microarray and Genomic Analysis Core Facility and a confirmation that the submission has occurred will appear on the window. You will also receive an email confirming the receipt of your submission.

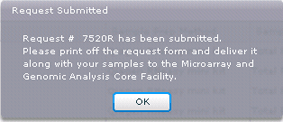
15. Click OK to clear the request confirmation dialog. The experiment summary for this request in the Experiments module will appear. This is where you will be able to print the request.
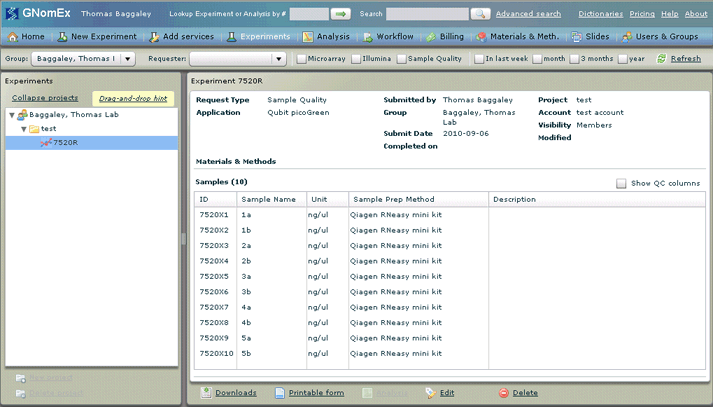
16. Click on the Printable form hyperlink to generate a printable copy of the request.
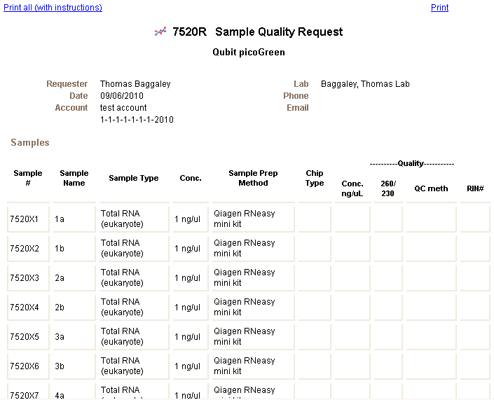
A separate browser window will open (outside the application desktop environment) with a summary of the request you just submitted.
17. Print a copy of the request using the browser's print function and bring the printed copy of that request together with your samples to the HCI Microarray and Genomic Analysis Core Facility.
The Next or Continue button at the bottom of one of the tabs is grayed out and doesn't do anything when I click on it — This button will only become available for use after you have entered all of the required information on that tab. In order to activate it, first be certain you have entered all of the required information on the current tab. To assist you in discovering required information that has been missed, when a required value in a grid has been left blank, that field will be displayed in pink. This will not happen with required fields that do not appear as columns in a grid, however. The button may also be inactive if you have skipped forward in the wizard and left a required field on a previous tab blank. If you are certain you have entered all of the required information on the current tab, review the previous tabs in the wizard to make certain you have entered all of the required information on them as well.