- Welcome
- Introduction
- Publications and presentations
- Signing in
- System requirements
-
How To
- Logging into GNomEx
- Submitting an experiment request
- Submitting a microarray hybridization request
- Submitting a sample quality request
- Submitting a sequencing request
- Requesting that microarray hybridization or sequencing be performed on samples previously submitted to sample quality testing
- Adding lanes to a previously submitted sequencing request
- Registering an external experiment in GNomEx
- Finding and viewing a summary of an experiment
- Editing an experiment
- Downloading experiment results
- Linking the samples from an experiment to their BST sample
- Viewing analyses
- Downloading analyzed data files
- Viewing a description of the materials and the methods used during processing of a specific kind of experiment
- Performing a search for experiments and analyses meeting a specific type of criteria
- Submitting a work authorization
- How pricing and billing works in GNomEx
- Adding a new price criterion
- Creating a new price sheet
- Creating a new price category
- Modifying an existing price sheet
- Modifying an existing price category
- Modifying an existing charge item
- Preparing and sending out invoices for clients
- Generating general ledger interface data for automatically billing university accounts
- Window, Tab, and Field Descriptions
-
GNomEx Error Messages and Information Windows
- Are you sure you want to delete all the hybridizations?
- Are you sure you want to delete all of the samples?
- At least one non-empty file must be selected in order for download to proceed.
- Please enter all of the required fields for the hybridization.
- Please enter all required fields for the samples.
- Please enter at least one search criterion.
- Please select a price category.
- Please select a price sheet.
- Remove all hybs currently showing in the list?
- Remove all samples currently showing in the list?
- The number of samples to setup has changed. Do you want to clear out the existing samples?
- The request has not been saved. Are you sure you want to quit?
- The request is now assigned to project.
- The webpage you are viewing is trying to close the window.
- Unable to generate GL interface. Cannot find approved folder.
- You are no longer logged on. Please logon again.
- Your changes have not been saved. Are you sure you want to exit?
-
Working With the List of Samples Submitting for Microarray Hybridization
- Adding a Sample to the List of Samples You Will Be Submitting for Microarray Hybridization
- Adding a sample to the list of samples you will be submitting for microarray hybridization that is similar to another sample already in the list
- Deleting a sample from the list of samples you will be submitting for microarray hybridization
- Deleting all of the samples currently included in the list of samples you will be submitting for microarray hybridization
-
Working With the List of Hybridizations By Requests
- Adding a hybridization to the list of hybridizations you will be requesting
- Adding a hybridization to the list of hybridizations you will be requesting that is similar to another hybridization already in the list
- Deleting a hybridization from the list of hybridizations you will be requesting
- Deleting all of the hybridizations currently included in the list of hybridizations you will be requesting
- Editing a hybridization from the list of hybridizations you will be requesting
- Working with the list of hybridizations you will be requesting
- The hybs tab (submit microarray hybridization request window)
- The submit microarray hybridization request window
- Submitting a microarray hybridization request
- Microarray hybridization requests
-
Specialized Role Topics
- Uploading a sample sheet
- Setting/changing the prices of a charge item
- Setting/changing the experiment type(s) associated with a price sheet
- Setting/changing the criteria by which a charge item will be applied to billing for an experiment
- The sample view tab (new experiment module)
- The hyb setup tab (new experiment request module)
- The hyb view tab (new experiment request module)
- The new project window
- The edit project window
- Adding a new project while you are entering a microarray hybridization request
- Editing an existing project while entering a microarray hybridization request
- Adding a new sample characteristic for annotation while submitting a sample hybridization
- Editing an existing sample characteristic for annotation while submitting a sample hybridization
-
Guides
- User Guide
- Experiment orders
- The foundation of GNomEx
- Experiments at a glance
- Submitting a HiSeq or MiSeq experiment order
- ABI Capillary (Sanger) Sequencing
- Checking on experiment progress
- Copy and pasting into samples grid
- Posting outside experiment data
- iScan experiments
- Downloading and uploading your data
- The download files window
- Downloading large data sets
- Downloading chromatograms
- Fast data transfer from the command line
- Troubleshooting guide for downloading
- Launching FDT with Webstart
- Uploading your data
- Annotating your experiment
- Associating experiment files back to the samples
- Sample annotations
- Copy and paste for the samples grid
- Bulk sample sheet import
- Analysis and data tracks
- Create an analysis
- Data tracks
- Disk usage
- Configuring GNomEx
- Context-sensitive help
- Customize the billing account fields
- Dictionaries
- Seq lib protocols and barcode schemes
- Configuring HiSeq rapid mode sequencing options
- Developer Guide
- Installation Guide
- Configuring GNomEx for FDT
- Configuring GNomEx to use LDAP Authentication
- Compiling and Building
- The Database Schema
- GNomEx Open Source
- Developer Documents
- Illumina HiSeq Realtime Info — The Metrix Server
- FAQs
- Demo
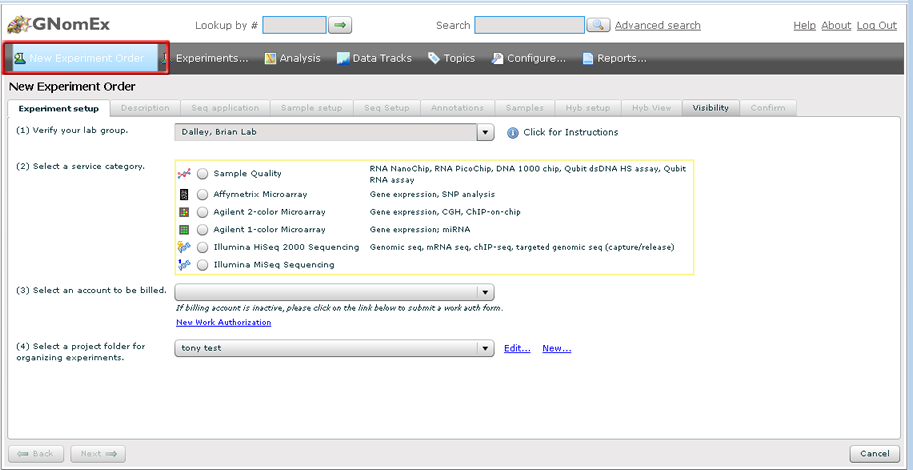
To submit an Illumina Next Generation Sequencing experiment order, click on the "New Experiment Order" link from the navigation bar.
Experiment setup
1. Verify your lab group and user name.
2. Pick the experiment platform from the list of radio buttons.
3. Select a billing account. If no options are listed, you must submit a work authorization form to the core facility. Click on the 'Work Authorization' link below the dropdown.
4. Now select a project folder. This is the folder that your experiment will be organized under. If you don't see a project folder that makes sense, click on the 'New/Edit..' link next to the project dropdown to create a new project.
5. When all of the fields have been entered, the 'Next' button will be enabled. Press it to continue on to the next tab.
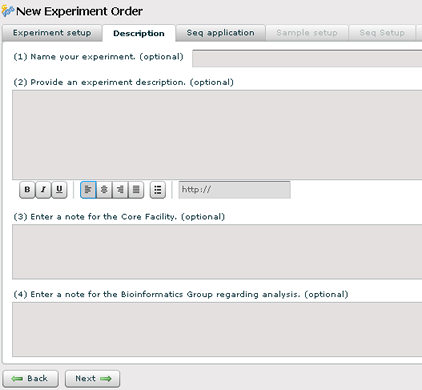
Description and Notes
You can name your experiment and provide a description. Also, there are 2 notes sections to communicate information about your experiment to the core facility and the bioinformatics core.
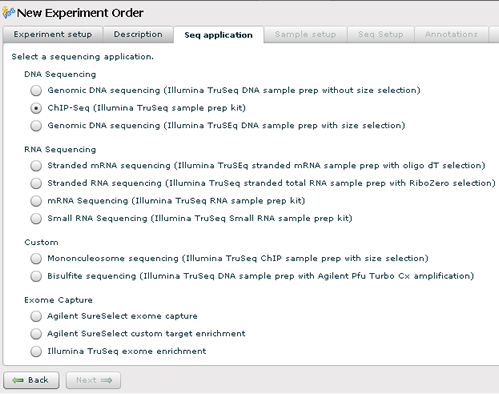
Sequencing Setup
1. Select the sequencing application that you want the core facility to perform. It is critical that you select the correct option here. If you are unsure, please contact the core facility before proceeding.
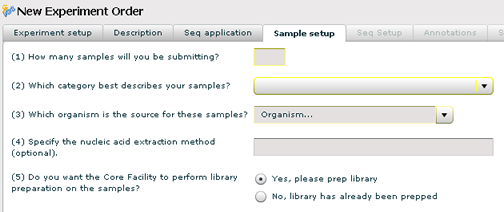
Sample Setup
1. Type in the number of samples you will be delivering to the core facility.
2. Choose a sample type (example: DNA, mRNA, etc..) from the dropdown.
3. Pick the organism (species) that you derived the sample from. This is a type-ahead dropdown, so just start typing the name of the organism in the dropdown and it will scroll to the entry.
4. Optionally, enter the nucleic acid extraction method that you used.
5. Check the first radio button if you wish the core facility to perform the Illumina library prep. Otherwise, check the second radio button if you have already performed this in your own lab.
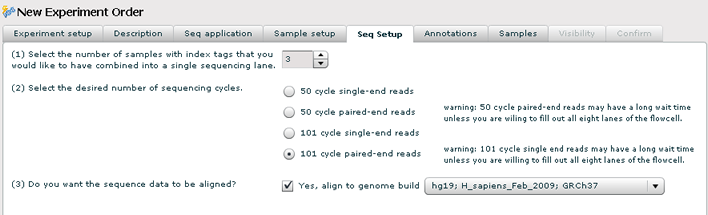
Sequencing Setup
1. Pick the number of samples that you want to run in one sequencing lane on the flow cell.
2. Choose the read length and whether the reads are single or paired end.
3. Check the genome build check box if you want the sequence aligned to a genome build. The lastest build is selectect by default but you can choose another genome build from the dropdown.
Sample Annotations
If you would like to further annotate your samples, check the annotations that apply. They will show up as columns on the sample grid in the next tab.

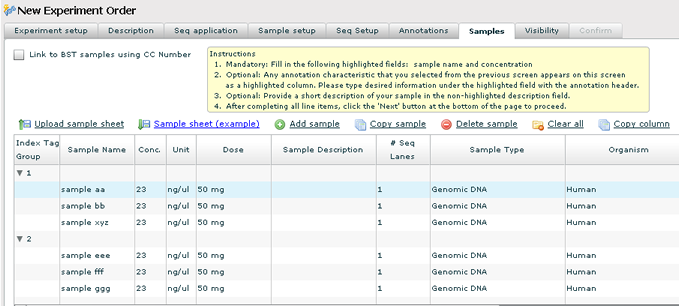
Samples
1. Enter all of your sample names. You will notice that the samples are grouped into rows. This is based on the number of samples that will be run in each lane. For example, on this order there are 6 samples and 3 samples will run in a sequence lane.
2. Sample concentration must also be entered. You can use the 'Fill' button to apply the current cells value to the rest of the rows in the grid.
3. Any annotations you checked on the previous tab will show up as a column in the sample grid. Unless the annotation was already marked on the annotations tab, the annotation is considered optional.
4. Use the 'Add Sample' and 'Copy Sample' links to add additional samples. This will override the number of samples you specified on the Sample Setup tab.
5. IMPORTANT — The 'Next' button is not enabled until all of the required fields (sample name and concentration) have been entered. Required cells are highlighted.
6. If you have a large number of samples, you can import the sample information using the 'Import Sample Sheet' link. The data file you upload must be saved as a tab delimited file. (In Excel, use the 'Save as' option and pick 'Tab Delimited (.txt)' as the file type. Example sample sheets are provided for download. A wizard will walk you through the process of uploading your sample sheet. When the upload is successful, the sample info in the grid should reflect all of the values from your file.
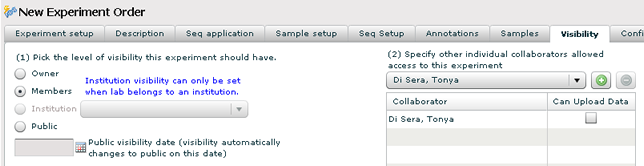
Visibility
1. Set the visibility for your experiment. This determines who can see your experiment and download the files.
- Owner — Set this if you this is a private experiment. Only you and the lab PI will have access to this experiment.
- Member — This is the default. Your experiment will be accessible from all members of your lab.
- Institution — Broader than Member visibility. Your lab as well as labs belonging to the same institution selected from the dropdown will have access to your experiment.
- Public — Everyone, including guest logins to GNomEx will have access to your experiment. Use this visibility for published data sets.
2. If you don't want the experiment to go public until a future date, set the date here.
3. Collaborators — This is a list of other GNomEx users that you want to grant access to your experiment. Use this when you have someone outside of your lab that should have access to your data. If you want this collaborator to upload additional data, check the 'Upload Data' check box.
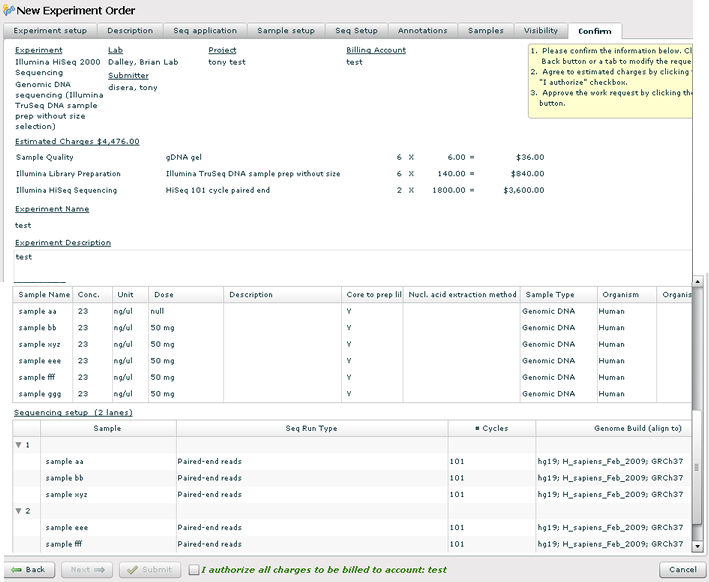
Confirmation
1. Carefully review the details of the experiment order.
2. The estimated charges are based on the current price sheets for Illumina services. Sample quality and library prep are per sample charges; sequencing is a per lane charge.
3. Check the 'I agree' check box.
4. Press the 'Submit' button. Print the request form. Label your samples according to the instructions provided on the printable request form.
5. You will receive email notification that the order was received. You will receive email notification again when the samples go through the Sample Quality check and then again when the experiment order is complete and the Fastq files are ready to download.